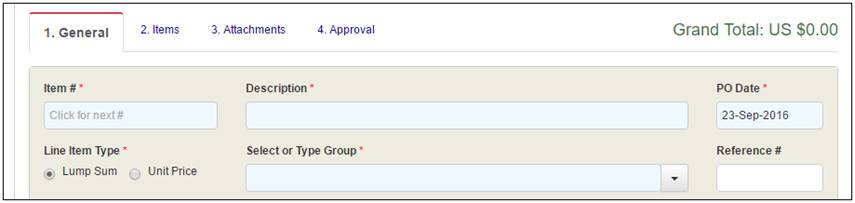
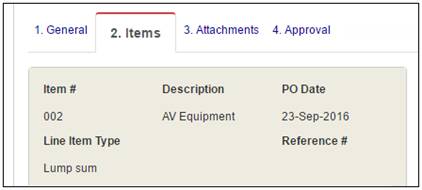
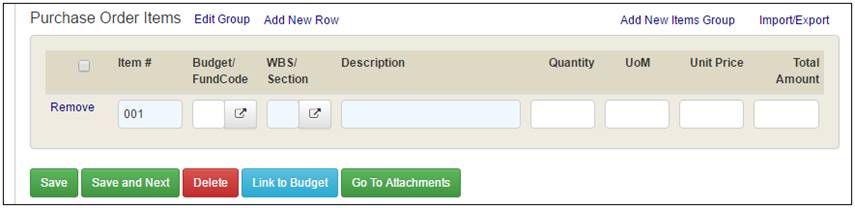
33. Sub-Contract Purchase Orders
To view existing POs, click the Purchase Order button in the left-side menu to extend the actionable links.
Click the All items link in the left-side menu to view the log.
In the main frame, click the description link to view the detail page for a purchase order. |
1. Click the Create new item link from the left-side menu. |
2. Click in the Item # field to automatically fill the PO number with the next available number. Alternatively, this number can be entered to coordinate with any external PO numbers. 3. Enter the Description for this PO. 4. The PO Date is auto populated with the current date. You can change this date if needed. 5. Select the Line Item Type: Lump Sum or Unit Price. By default, Lump Sum is selected for you. 6. Select or Type Group: Use this field to set the group or category for this PO. In the log page, POs will be separated by group/category. Also, the default groups that are available in the drop-down list come from the groups in the Budget. 7. Optionally, you can enter a Reference #, or a separate tracking number. |
8. By default, the user who is creating the PO is selected as the Vendor. Click the Select Vendor button to choose a different user or contact if you are entering this PO on behalf of someone else.
The Add users or contacts pop-up will display. |
|
· Use the radio buttons to select if you want users or contacts.
· In addition, you can enter Keywords to filter the list.
· Then select the radio button for the user or contact to be the Vendor or Awardee for this PO. |
|
9. Optionally, you can Select the Buyer in the same way you selected the vendor. 10. Optionally, enter the Payment Terms and Invoice Address. |
|
11. In the Shipping section, enter any optional fields, such as: · Anticipated Delivery date · Ship Via · FOB Terms · Shipping Address · Shipping Notes |
12. If you have Accounting rights, you can enter the necessary information in the Payment Status and Custom Accounting fields. |
13. Click the Save button to keep this information or Save & Next to continue. Note: The new Purchase Order must be saved in order to enter further details such as Line Items or attachments. |
To add items to the Purchase Order, go to the Items tab.
Line items can be entered manually or by import. |
To manually enter an item 1. Complete the following fields: · Item #: auto populates with the next sequential number · Budget/ Fund Code: Use
the · WBS/ Spec Section: Use
the · Description · Quantity, UoM (Unit of Measure), and Unit Price: These fields only display for Unit Price POs. · Total Amount 2. Click the Save button. |
To change the Group, click Edit Group link. To add more line items, click Add New Row link. To add a new Group, click Add New Items Group link. |
To import items: 1. Click the Import/Export link.
The Import/Export items pop-up displays. |
|
2. Click to Download blank MS Excel template. 3. Save the template and add line item information. 4. Click the Choose File or Browse… button to locate your template file. Note: If you need to replace the current items in the PO, mark the check box for Delete all existing items. 5. Click the Import button.
The items in the template will be listed in the Purchase Order Items section. |
Linking PO Line Items to the Budget
To create or alter a link between a line item in the Purchase Order and a line item in the Budget: 1. Mark the check box for one or more line items in the Purchase Order. 2. Click the Link to Budget button.
The Edit Link To Budget popup displays. |
|
3. Select the radial button for the action you wish to take. 4. Additional fields will display depending on your selection. Enter the appropriate information. 5. Click the Save button. |
Once you have entered all information, you can upload attachments and begin the approval process. Please refer to the Attachments Tab and Approval Process sections in this user guide. |
Once the PO is approved, Purchase Order fulfillment can be tracked within Projectmates. You will notice two additional tabs become available: Receive and Return. |
Receiving and Returning Purchase Order items
When items are received for a PO, you can track the quantity under the Receive tab in the PO Details page. |
To track Receivables, on the Receive tab, enter the Quantity Received. Then click Save & Finalize. Note: For lump sum priced items, you can enter a decimal that represents how much to apply as a receivable. Once the order quantity and the received quantity are the same, Projectmates will mark the item as Fulfilled. |
Note: To save time, you can mark an entire item as fulfilled by clicking the check box. Once you save the entry, you will see the green checkmark that indicates completion of the line item. |
Note: If an item has been received, but it is broken or not the correct item, you would still mark it as 'Received', and you would also mark it as 'Returned'. |
To track Returned items: 1. Click the Return tab. 2. Enter the Quantity Returned. Note: Projectmates will compare the Quantity Returned to the Quantity Received to verify the entry. 3. Click Save & Finalize to complete. |
To view the log page for the Purchase Order module, click the All Items link in the left-side menu.
The Purchase Order log page displays. |
To view the different status groups of Purchase Orders, click the different tabs at the top. For example: Pending, Approved, Rejected, or All. |
To sort the log, click the
column headings. Toggle between ascending or descending order,
shown by the |
To remove a Purchase Order,
mark the check box for the PO. Then click the |
To view the audit log for
a PO, click the Audit |
To view the detail page of a PO for editing or processing, click the description link. |
To locate a specific PO, enter any part of the number or description in the Search by Number or Description field. |
Printing Purchase Orders
To print a Purchase Order
or a log page, click the
To email a PO or a log page, click the |
Linking Purchase Orders to the Budget