32. Managing Sub-Contracts, PCOs, and Change Orders

Contracts

Creating Contracts

Once you have awarded bid packages to vendors, you can easily convert the packages into contracts. When you convert a bid package into a contract any links to the budget for the package line items are brought over to the contract line items.


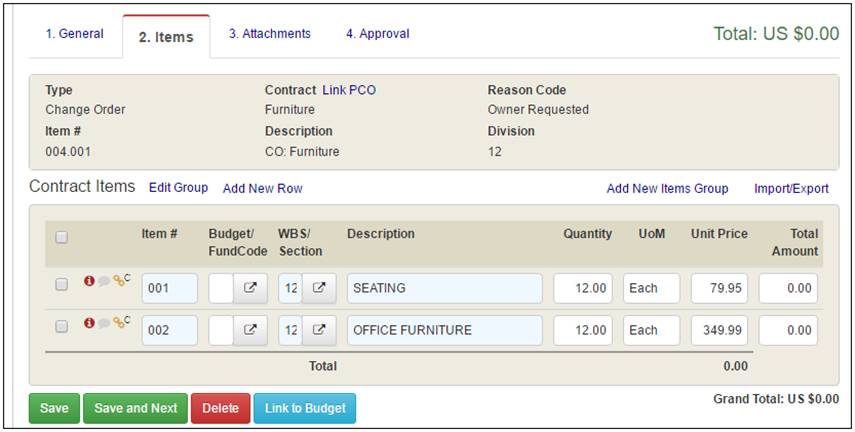
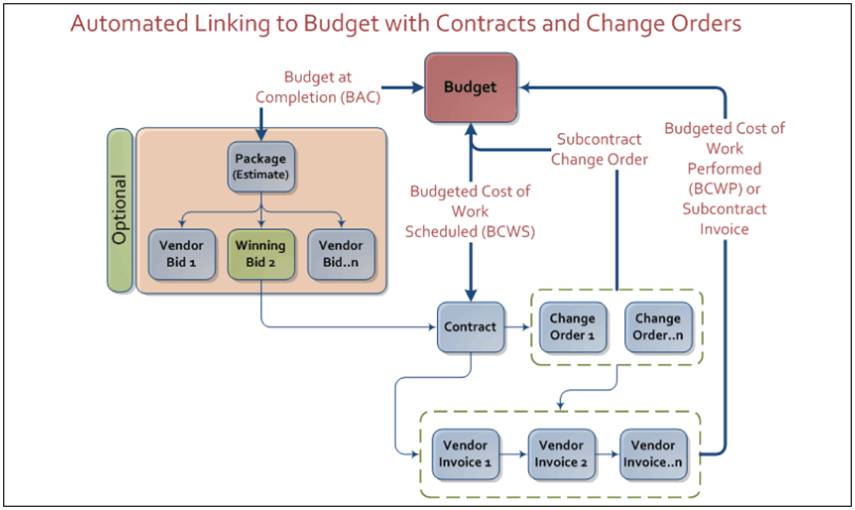
To convert a bid package into a contract:

1.   View the bid package log page.

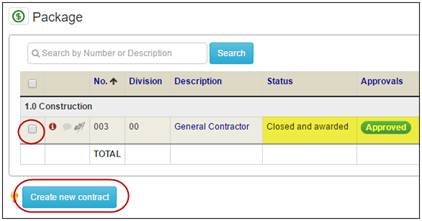
2.   Mark the check box for the bid package that you want to convert.

Note: If you select multiple bid packages to be converted, you can combine them into one contract by marking the check box for Consolidate all groups.

3.   Click the Create new contract button.

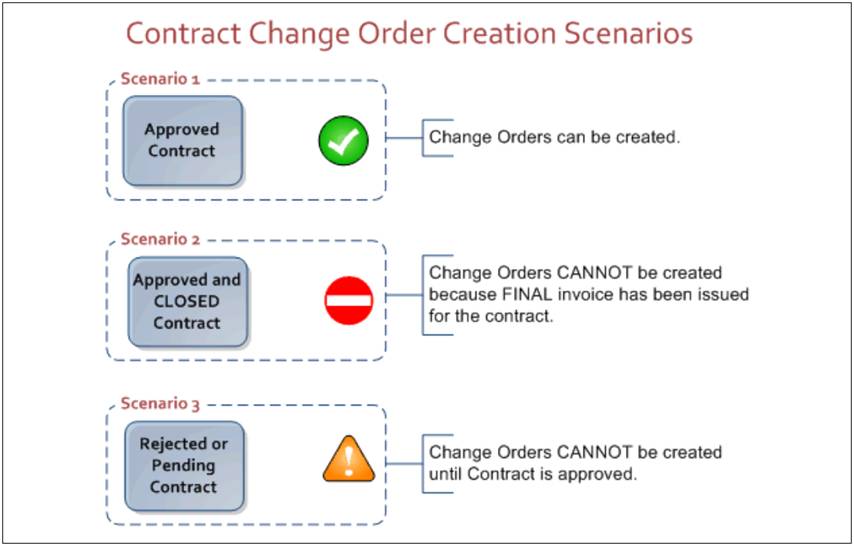
Note: Bid packages must be closed and awarded as well as approved to create contracts.


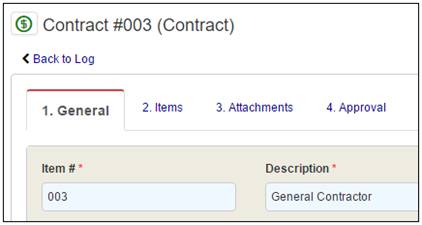
The new contract has now been created.


The Contract detail page for the new contract displays.


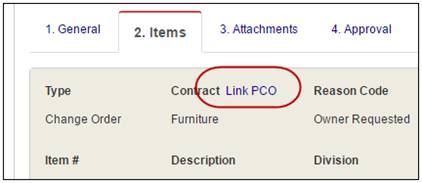
You also have the option of creating a contract without using a bid package.


To create a new contract without a package:

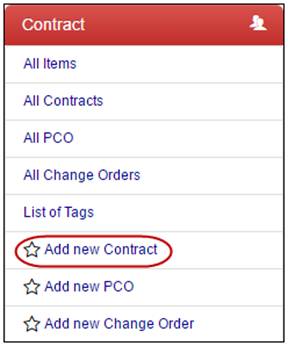
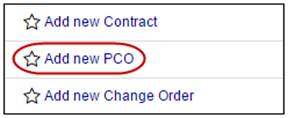
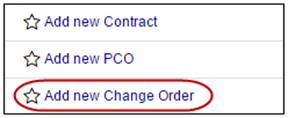
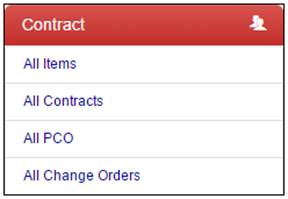
1.   Click the Contract / PCO / Change Order module thread in the left-side menu to expand the actionable links below.

2.   Click the Add new Contract link.


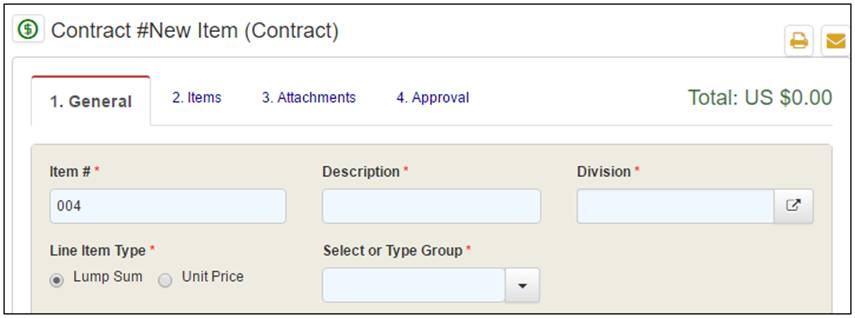
The Contract / PCO / Change Order screen displays.


Contract - General Tab

3.   The system automatically fills the contract number with the next available number. Optionally, you can enter any external contract number.

4.   Enter the Description for this contract.

5.   Manually enter or use the  Lookup icon to select the Division number.

6.   Select the Line Item Type: Lump Sum or Unit Price.

7.   Select or enter the Group.

Note: The default selection options in the Group drop-down come from the categories listed in the Budget module.


8.   Click Select Awarded To button to add an Awardee.

The Add users or contacts screen displays.


9.   Use the radial buttons at the top to control the list below.


10. When you have located the appropriate user or contact, mark the radial button.

The user or contact that was selected is now displayed in the Contract.


11. Enter the Retainage % for Work Completed and Materials Stored.

12. The Created On Date auto populates with the current date. If needed, you can change it to the appropriate date.

13. Optionally, enter the Scope of Work and any Notes.

14. Click the Show links for Additional Contract Details and/or Accounting and Status to view these fields.

Note: If you have Accounting rights, the Accounting fields are automatically shown.


15. The Additional Contract Details section stores the following details for the contract:


·         Original Start Date

·         Actual Start Date

·         Effective On Date

·         Extended Until Date

·         Original Substantial Completion Date

·         Contract Type

·         Bond Type

·         Fund Codes

·         Package Numbers


16. The Accounting and Status section stores the Payment Status for the contract as well as up to 8 custom accounting fields.

Note: Custom Accounting field labels can be changed by the Site Administrator.


17. Click the Save button before continuing.


Contract - Items Tab

The Items tab lists all of the line items and their values for this contract.


Line items can be added to this contract two different ways: manually or by import.

To manually enter an item

1.   Complete the following fields:

·         Item No.: auto populates with the next sequential number

·         Budget Code: Use the  Look up icon to search for a budget code, if needed.

·         Spec Section: Use the  Look up icon to search for a WBS/ Section code, if needed.

·         Description

·         Total Amount

Note: If you selected Unit Price, you will see the following fields after Description: Quantity, UoM (Unit of Measure), and Unit Price.

2.   Click the Save button.


To change the Group, click Edit Group link.

To add more line items, click Add New Row link.

To add a new Group, click Add New Items Group link.

To import items:

1.   Click the Import/Export link.


The Import/Export items pop-up displays.

2.   Click to Download blank MS Excel template.

3.   Save the template and add line item information.

4.   Click the Choose File or Browse… button to locate your template file.

5.   Click the Import button.


The items in the template will be listed in the Contract Items section.


Attachments & Approvals

Once you have entered all information, you can upload attachments and begin the approval process.  Please refer to the Attachments Tab and Approval Process sections in this user guide.


Prepare Printable Contracts

Once all contract related information has been entered, you can print your contracts by exporting information to MS Word. It is necessary for your Project Administrator to configure the Contract Word Template. Please contact your Project Administrator if this configuration is not complete.


To export the contract into MS Word:

1.   Drill into the contract details page by clicking the description link for the contract from the contract log page.

2.   Click the Export… drop-down and select the Word template.


This file will include your basic contract boilerplate from the template with specific details inserted from the data stored in Projectmates already filled out.


Note: If you are unable to see the Word file for Contracts, contact your project administrator to setup the Contract Template.


Proposed Change Orders

Once a contract has been approved, users can propose changes to it through a Subcontract Proposed Change Order, or PCO. PCOs provide the paper-trail that leads from an executed contract to the change orders against that contract including linking any RFIs. PCOs do not directly reflect in the budget.


Creating Proposed Change Orders

To create a new PCO:

1.   Click the Contract / PCO / Change Order module thread to expand the actionable links below.

2.   Click the Add new PCO link.


The Contract / PCO / Change Order – PCO – General tab displays.


PCO – General Tab

3.   Use the drop-down list to select the contract for this PCO.


Once a contract is selected, data from the contract auto-fills the fields in the PCO form. The auto-filled fields can be changed, if necessary.


4.   Use the drop-down lists to select the Reason Code and the PCO Type.


5.   Enter the number of days of change that is proposed with this PCO.


For example, if the proposed change will add 3 days to the substantial completion date, then enter the number '3'. Likewise, if the proposed change will shave a couple days off the substantial completion date, then enter the number '-2'.

6.   By default the Created On Date auto populates with the current date. Change this if necessary.

7.   Optionally, enter details in the Scope of Work and/or Notes fields.


8.   If you have Accounting rights, you can enter the necessary information in the Payment Status and Custom Accounting fields.

9.   Click the Save button.

Note: The remaining tabs (Items, Attachments, and Approval), behave the same as in Contracts.


Linking RFIs to PCOs

Often, a Change Order begins with an RFI. You can track RFIs to PCOs to Change Orders to capture the full history.


To link an RFI to a PCO:

1.   Open a pending PCO.

2.   Click Link RFI.


The Select RFI from Threads to Link pop-up displays.


You can either locate particular RFIs by clicking the thread names listed or filter the list by entering keywords in the Filter by RFI Name field.

To manually locate an RFI:

1.   Click the thread name.


The list of approved RFIs will display.


2.   Mark the check box for one or more RFIs to link to this PCO.

3.   Click the Link Selected RFIs button.

To filter the list of RFIs:

1.   Enter part of the name or number for the RFI in the Filter by RFI Name field.

The list of RFIs will update listing only those RFIs that match the filter entry with each keystroke.


2.   Mark the check box for one or more RFIs to link to this PCO.

3.   Click the Link Selected RFIs button.

Review the RFIs listed under the Selected RFI List header.


To remove any from this list, mark the check box for the RFI and click Unlink.


Click the Apply and Close button.

The pop-up will close and the PCO screen will refresh showing the RFIs link icon.


Change Orders

Once a contract has been approved, the only way to make changes to it is through a Change Order.


Creating Change Orders

To create a new Change Order:

1.   Click the Contract / PCO / Change Order module thread to expand the actionable links below.

2.   Click the Add new Change Order link.


The Contract / PCO / Change Order – Change Order – General tab displays.


Change Order – General Tab

3.   Use the drop-down list to select the contract for this Change Order.


Once a contract is selected, data from the contract auto-fills the fields in the CO form.


The auto-filled fields can be changed, if necessary.


4.   Use the drop-down list to select the Reason Code for this change order.

5.   Enter a description for this change order.


6.   Enter the number of days added or deducted in this change order.


For example, if the proposed change will add 3 days to the substantial completion date, then enter the number '3'. Likewise, if the proposed change will shave a couple days off the substantial completion date, then enter the number '-2'.

7.   By default, the Created On Date auto populates with the current date. Change this if necessary.

8.   Optionally, enter details in the Scope of Work and/or Notes fields.


9.   If you have Accounting rights, you can enter the necessary information in the Payment Status and Custom Accounting fields.

10. Click the Save button before continuing.


Change Order - Items Tab


11. Click the Items tab.

12. Notice the line items from the Contract are pulled into the Change Order. You can adjust these line items to enter changes or add new line items as described in Contracts.

Note: The remaining tabs, Attachments and Approve, are the same as in Contracts.


Linking PCOs to Change Orders

To link PCOs to Change Orders:

1.   Inside the Change Order details page, once a Contract has been selected for the Change Order, click the PCO Link next to the Description field on any tab.


A pop-up will display any PCOs available to be linked to this change order.

2.   Mark the check box for one or more PCOs.

3.   Click Apply and Close.


When one or more PCOs are linked to the Change Order, the system adds a line item for each PCO under a new group called Change Order.

4.   You can edit the Group, Item #, Budget Code, WBS/Section Code, Description, Quantity, UoM (Unit of Measure), Unit Price, and Total Amount as needed to complete the Change Order.

5.   Click Save and Next to continue.


Linking Contracts and Change Orders to the Budget

When a contract is converted from a bid package, whose items are already linked to the budget, the contract items are automatically linked to the budget. Any subsequent Change Orders and Invoices for this contract are also automatically linked to the budget.


You can immediately determine if line items in the subcontract modules are linked by looking for the link icons. In the example shown below, a line item is showing the  icon, which means it is linked to the budget.


For more details on the existing links you can click the link icon for the line item, and a summary will display.


You can easily create, remove and update links to the budget. For example, when new items are added to a contract or change order that did not exist in the original bid package or when existing line items are not already linked, simply select the line items and use the Link to Budget button.


You will be given three options as shown below

·         The first option will create new line items in the budget for the items selected.

·         The second option will allow you to link items to existing line items in the budget.

·         The third option will allow you to remove the links to budget line items.


Contract / PCO / Change Order Log Pages

You have the option of viewing all items or different types of items in the log.


To access the Contract/PCO/Change Order log page, click the link in the left-side menu to select the view of your choice.


·         The log page shows basic information about each item including the Number, Description, Award Company, Approvals, Amount, All COs, Last Action date, and Responsibility.

·         To locate a particular Contract, PCO or Change Order, enter part of the number or description in the Search by Number or Description field.

·         Icons on the left show if there are comments or flags associated with Contracts, PCOs or Change Orders.