29. Subcontract
Buy-Out/Bid Packages
Buy-Out/Bid
Packages Log Page
To access the Bid Packages
log page:
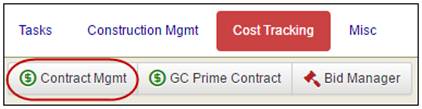
1. Click the Contract Mgmt button
under Cost Tracking tab in the navigation frame.
The Cost Tracking left-side menu options will
display |
|
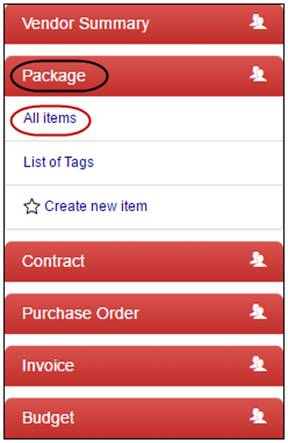
2. Click the Bid Package tile in the
left-side menu.
3. Click the All items link.
The Bid Package log page will display. |
|
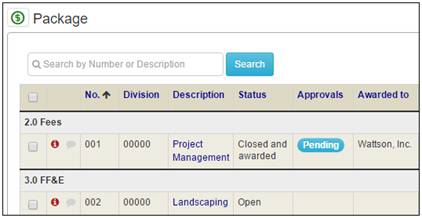
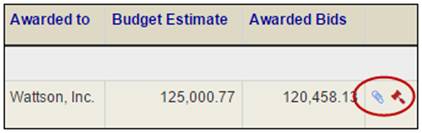
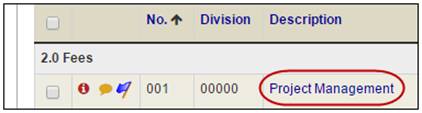
The bid package log page
shows basic information about each package including the Division, Description,
Status, Approvals,
Awarded to, Budget Estimate, and
Awarded Bids.
To locate a particular Bid Package, enter
part of the number or description in the Search
by Number or Description field. |
|
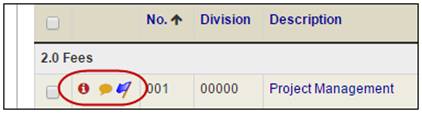
Icons on the left show if
there are comments or tags associated with bid packages. |
|
Icons on the right show if
there are attached files or if the package is being used in Projectmates
Bid Manager. |
|
Buy-Out/Bid
Package Details
To view the Bid Package details
page, click the description link in the Bid Packages log page.
The Bid Package details page will display. |
|
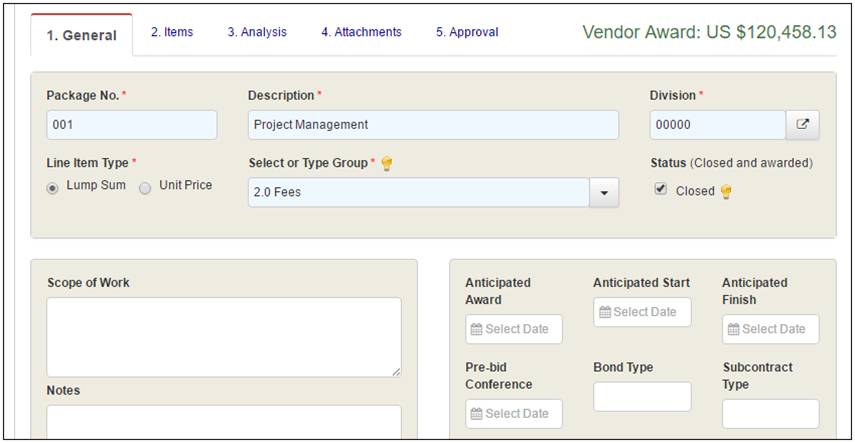
The Bid Package details page is broken into five tabs:
General, Items,
Analysis, Attachments,
and Approval.
General Tab
The General tab stores basic information about the
bid package such as Anticipated Dates and Scope of Work.
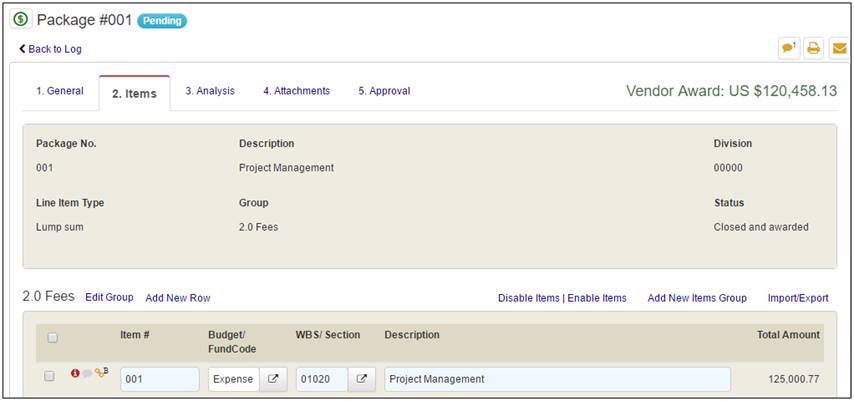
Items Tab
The Items tab stores information
about which items are included in the Bid Package such as Budget
Code, Spec Section, Description, Quantity, Price, and Total Amount. |
Analysis
Tab
The Analysis tab stores information
about the bids submitted by the vendors and allows users to compare
bids. This is also where a user would award the bid to a specific
vendor. |
Users can print or email
a bid package at any time by using the  Printer Friendly or Printer Friendly or  Email
icons. Email
icons. |
|
Creating
a Subcontract Buy-Out/Bid Package
Line items in your budget
group can be selected, packaged together and sent out for bids
to various subcontractors or vendors. The following procedure
shows how to create a Bid Package. |
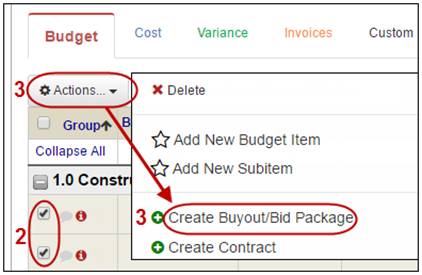
Create
Bid Package from Budget Items
To create Bid Packages from
Budget line items:
1. Click the View Budget link in the
Budget left-side menu.
The Budget log page will display. |
|
2. Mark
the check boxes for line items to be added to the Bid Package.
3. Click the Create Buyout/Bid Package
link in the Actions… drop-down list.
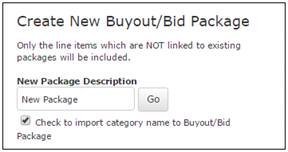
The New
Package Description pop-up displays. |
|
4. Enter
the name you want for the Bid Package.
5. Optionally, you
can select to maintain category distinction for the line items.
6. Click the Go button. |
|
7. The Bid Package details
screen displays the Items tab.
8. Notice that the items
you selected in the Budget are automatically listed in the Contract Items
list.
Your new subcontractor package is created. The  icon
indicates that a line item is linked to the budget.
icon
indicates that a line item is linked to the budget.

Manually
Enter Package Items
If you do not wish to create
a package using line items in the budget, you have the option
to create a package by entering items manually. |
To manually create Bid Packages:
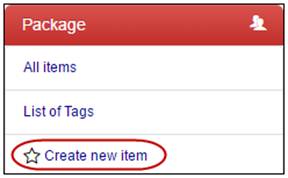
1. Click the Create new item link
in the Bid Package left-side menu.
The Bid Package screen will display. |
|
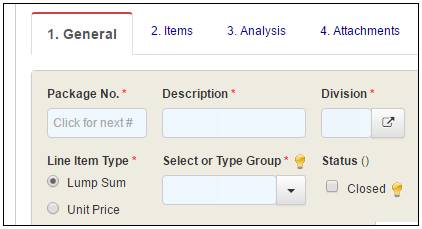
2. Click
in the Package No.
field to generate the next sequential number. You can then alter
the number if needed.
3. Enter a Description of the Bid
Package you are creating.
4. Enter the Division manually or
use the  Select Specification
icon to select one. Select Specification
icon to select one.
5. Use the radio
buttons to select the Line
Item Type.
6. Use the down
arrow to select a Group.
Alternatively, type a new group.
7. Optionally, mark
the Status as Closed. (not common) |
|
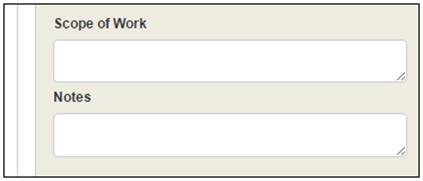
8. Enter
the Scope of Work
in the text area provided.
9. Enter any Notes associated with
this Bid Package. |
|
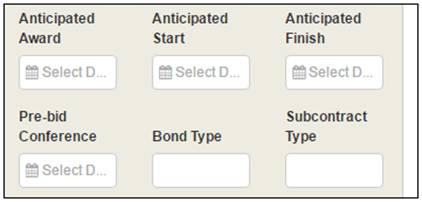
10. Optionally,
enter the
· Anticipated Award
Date
· Anticipated Start Date
· Anticipated Finish Date
· Pre-bid Conference Date
· Bond Type
· Subcontract Type |
|
11. To keep this
information and continue, click the Save
button or Save & Next
to advance to the Items tab. |

|
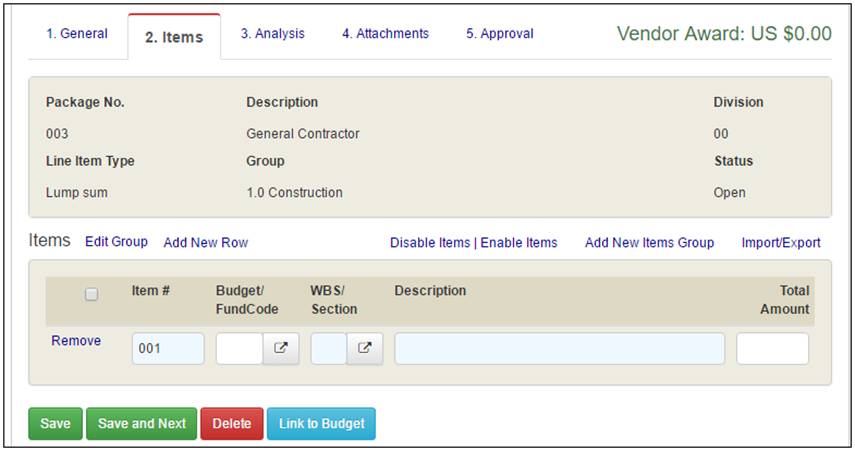
To populate the Items tab:
· Optionally,
click Edit Group
link to edit the group name. Make the necessary changes and click
OK.
· Click
the Add New Row
link to add additional rows.
· Mark
the check box for the items to be disabled and click the Disable Items link to
disable line items.
· Mark
the check box for the items to be enabled and click Enable
Items link to enable line items.
· Click
the Add New Items Group
link to add a different group.
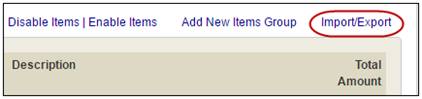
· Click
the Import/Export
link to open the import/export items pop-up. Click
for more details.
· Mark
one or more check boxes and click the Link
to Budget button. Click
for more details.
· To
keep this information, click the Save
button, or to save and continue, click the Save
& Next button. |
Import
items from Excel
If you have a lot of items
to add to a Bid Package, you may prefer to import them instead
of entering them individually. |
To import items into a Bid
Package:
1. Click the Import/Export link.
The Import/Export Items pop-up displays. |
|
2. Click
to Download blank MS Excel
template.
3. Update the template
file in Excel and save to your computer.
4. In Projectmates,
click the Browse…
or Choose File
button to locate the file you just created.
5. Click the Import button.
To export the line items from this Bid Package,
click the Export
button.
Optionally, click the check box to Blank
out Unit Price and Amount columns in the exported data
before exporting. |
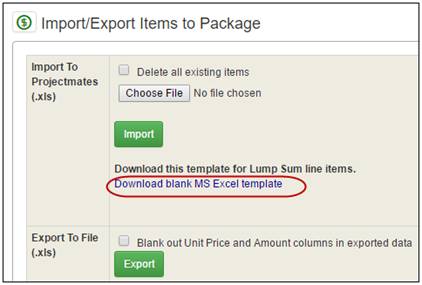
|
Tip: Exporting
a blank list of items will provide you with a form for vendors
to enter their line item unit prices and amounts without seeing
your budgeted amounts. Later, you can import the vendor responses. |
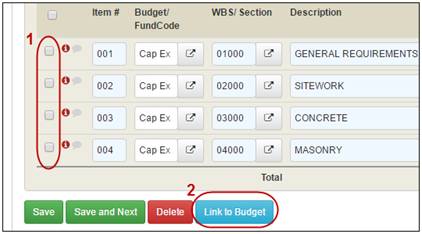
Link
Items to Budget
To link items from Bid Package
to the Budget:
1. Mark one or more
items to be linked to the budget.
2. Click the Link to Budget button.
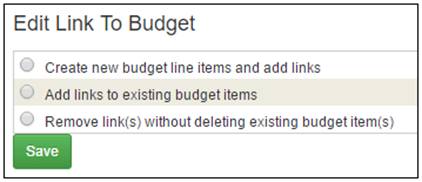
The Edit Link to Budget pop-up displays. |
|
3. The
system gives you three options:
· Create
new budget line items and add links – Select this option if the
line items you want to link do not yet exist in the budget.
· Add
links to existing budget items – Select this option if the line
items you want to link are already listed as subitems in the budget.
· Remove
link(s) without deleting existing budget item(s) – Select this
option if the line items are inappropriately linked to the budget. |
|
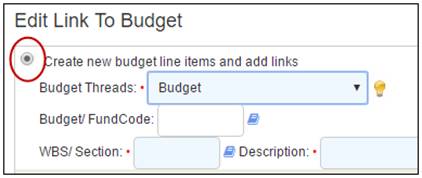
If you select the Create
new budget line items option, the pop-up will prompt you
to provide the Budget
Thread, Budget/Fund
Code,
WBS/Section, and
Description for
the line item.
Click Save
to complete the transaction. |
|
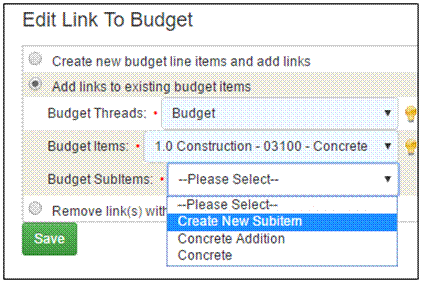
If you select Add
links to existing budget items option, the pop-up will
prompt you to select the Budget
Thread, Budget
Item, and Budget
Subitem.
Optionally, you can select to Create
a New Subitem or link to an existing subitem in the budget.
Click Save
to complete the transaction. |
|
Tip: You can continue
processing this bid in the Bid Package module by reading the next
section: Selecting Vendors to Use. Alternatively, you can use
the Bid Manager module to post this bid online on Projectmates
Bids/Planroom. |
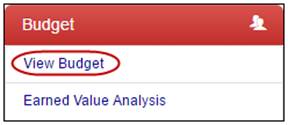
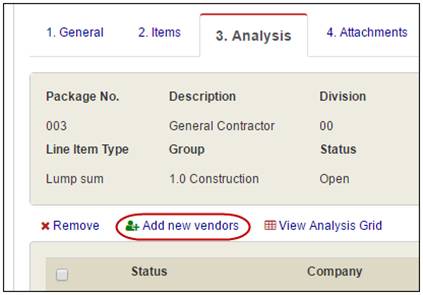
Selecting
Vendors to Use
After you have submitted
your subcontractor bid package you will want to specify the vendors
that will be bidding on these items.
To add vendors to a Bid Package:
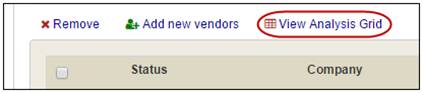
1. Click the Analysis tab.
2. Click the Add new vendors link.
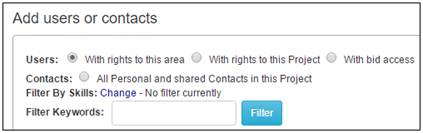
The Add
users or contacts pop-up displays. |
|
3. Use
the Users or Contacts radial buttons
and/or Keywords
to filter the vendors in the list below. |
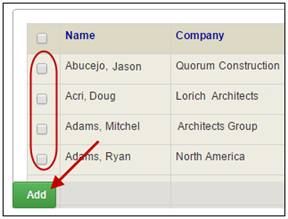
|
4. Mark
the check boxes for the vendors you want to consider in this Bid
Package.
5. Click the Add button.
The bid package details screen refreshes to
show the vendors you selected. |
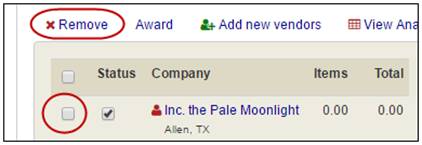
|
To delete a vendor from the
list, mark the check box for that vendor and click the Remove
link. |
|
Note: If a package
is associated with a bid, subscribed bidders to the package will
automatically be added to this list. |
Entering
the Subcontractor Bids
After you have completed
items in the bid packages and listed the vendors, you can enter
the received bid amounts. |
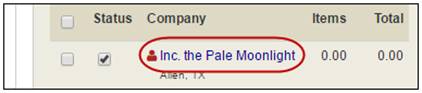
To
enter vendor bids manually:
1. On
the Analysis tab, click the Company
Name link.
The Vendor Items tab displays. |
|
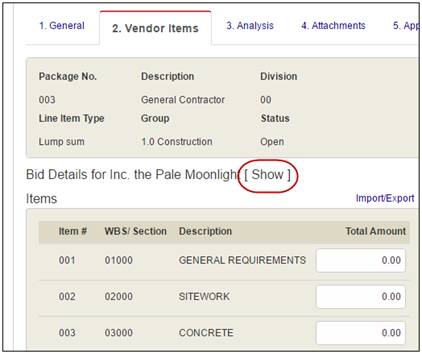
2. Enter
the pricing information from the vendor's bid response.
3. Optionally, click
Show to enter additional
Bid Details for the vendor.
4. Click the Save button.
Note: If a package is associated
with a bid, submitted package bids will automatically be added
to the vendor bid details screen. |
|
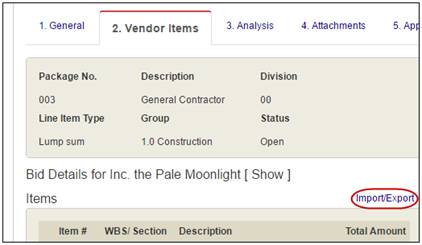
To
import vendor bids from Excel:
1. On
the Analysis tab, click the Company
Name link.
The Vendor Items tab displays. |

|
2. Click
the Import/Export
link. |
|
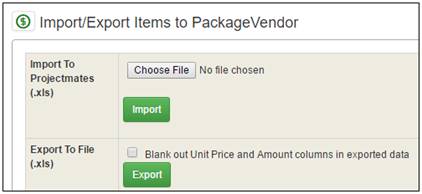
3. If
you have not done so already, you can obtain an import template
by exporting the line items and blanking out the Unit Price and
Amount columns in the exported data.
Mark the check box to blank out the data.
Click Export button.
4. Use the template
to create separate files for each vendor's bid details. Prepare
one for each vendor.
5. Repeat step 1
and 2 above to reenter the Import/Export pop-up.
6. Click the Browse… or Choose
File button to select the import file for the individual
Vendor.
7. Click the Import button.
8. You will see
a confirmation message to indicate the file has been successfully
imported. Close the Import/Export pop-up. |
|
Hint: You can send
the blank Package Template file to the vendors to fill out. Once
the vendors have filled out the values in the template, you can
import the templates. |
Analyzing
Vendor Bids
After bid details have been
entered for the Vendors, Projectmates can assist with analyzing
bid information, comparing bids to estimates, and making a recommendation
as to the best offer for the specified items. |
To analyze vendor bids:
1. On the Analysis tab in the Bid
Package details screen, click the View
Analysis Grid link.
2. Use your browser
options to save or open the Excel file. |
|
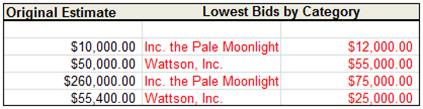
3. Open
the Bid-Package-Analysis.xls
file.
The file will load in Excel showing a side-by-side
view of all bid details received. A recommendation is made in
the analysis but the final decision is up to you. |
|
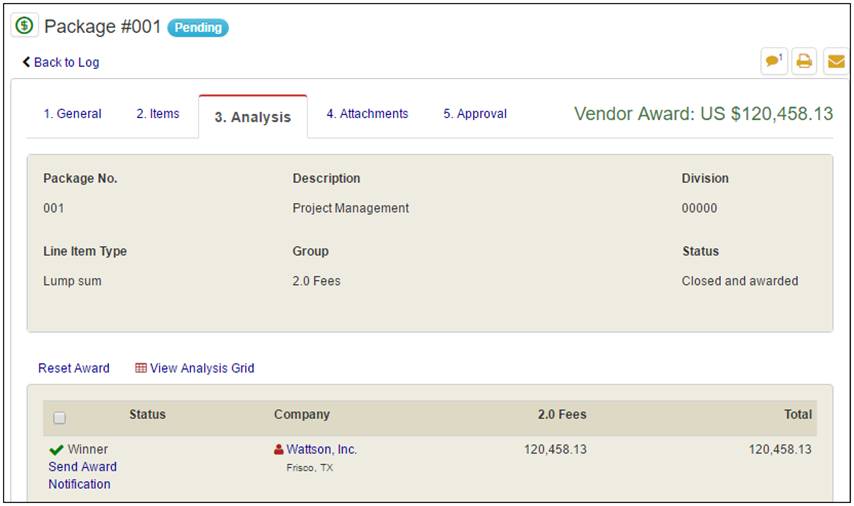
Awarding
the Bid
After you have determined which vendor has presented
the best offer, you can award the bid to that vendor.
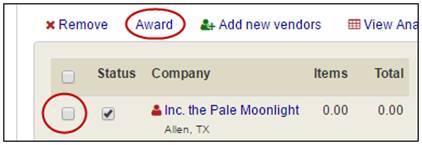
To award a bid:
1. On the Analysis tab, mark the
check box for the vendor to be awarded the bid.
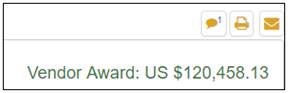
2. Click the Award link.
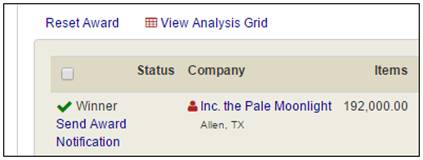
The screen will refresh to show  Winner next to
the selected vendor. Winner next to
the selected vendor. |
|
To deselect the current Vendor
and pick another, click the Reset
Award link.
To send an email notification to the selected
Vendor:
1. Click the Send Award Notification
link.
The Award Notification form will display under
the list of vendors. |
|
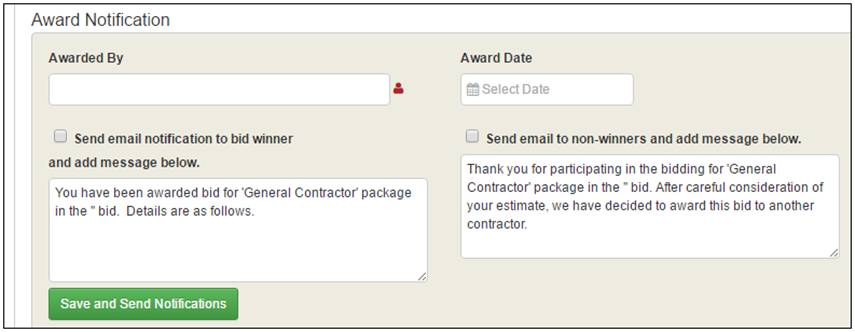
2. For
the Awarded By
field, click the  icon
to display the Add users or contacts pop-up. Select the appropriate
user. icon
to display the Add users or contacts pop-up. Select the appropriate
user.
3. For the Award Date field, click
in the text box to select the appropriate date.
4. Optionally, mark
the check boxes to Send
email notification to bid winner and/or Vendors
who did not receive the award. Sample verbiage for the
emails to be sent has been pre-filled by Projectmates. You can
alter it as needed.
5. Click the Save and Send Notifications
button. |
Attachments
and Approvals Tabs
File attachments can be added
at any time to support packages and submitted bids. Once a package
is awarded, the approval process can be initiated. Please refer
to the Attachments Tab and Approval
Process sections in this user guide. |
Converting
the Bid to Contract
After the bid has been awarded
and approved, you can automate the creation of a Contract. The
contract will be awarded to the same vendor and all of the vendor
line items will be transferred to the contract items tab as well.
In addition, if the bid was created from the Budget, then the
line items in the contract will also be linked to the same budget
subitems. |
Convert
the Bid to Contract from the Log Page
To convert the bid to a contract
from the log page:
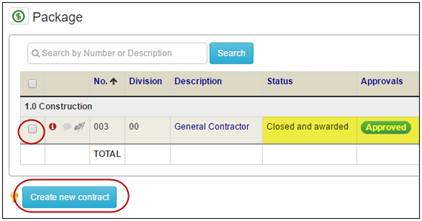
1. Verify the Bid Status says 'Closed
and awarded' and the Approval
Status says 'Approved'.
2. Mark the check
box for the Bid Package.
3. Click the Create new contract button.
The new contract is created and saved. You
can make any necessary revisions to the General tab, including
adding retainage amounts. Click for more details. |
|
Convert
the Bid to Contract from the Detail Page
To convert the bid to a contract
from the detail page:
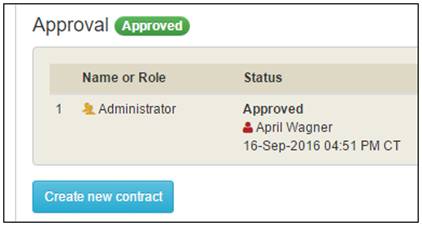
1. After processing
the approval for the bid package, the Create new contract button
will display.
2. Click the Create new contract button.
The new contract is created and saved. You
can make any necessary revisions to the General tab, including
adding retainage amounts. Click for more details. |
|