24. Finance & Budget - Pay Apps (Invoices)
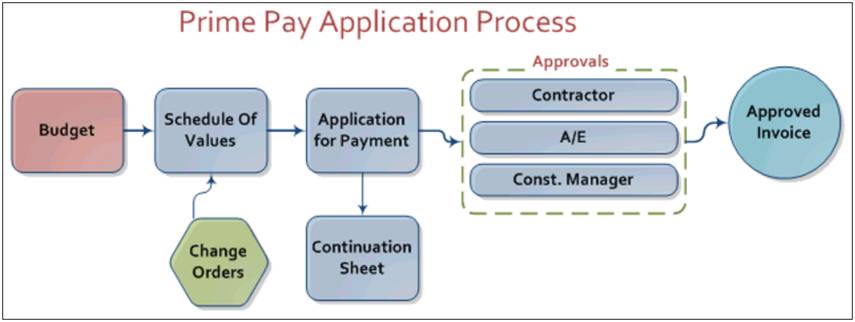
The Pay Application, also known as Invoices or Progress Billing, is used to document work completed and to prepare a pay application for the owner's approval. Pay Applications are typically generated by the general contractor and certified by the design professional and/or construction manager. Only one pay application can be created per pay period. Approved change orders are automatically included in the pay application. |
Note: This section will review prime contract pay apps. This module differs slightly from subcontract pay apps. |
Note: If the Owner, Architect/Engineer, or Contractor are not users in the system, they can be set-up as contacts. Contacts in these roles will neither receive system email notifications nor will their approval be needed. Ask your Project Admin to set this up for you, if needed. |
The Pay Application module provides the following functionalities: |
· Prepare a Schedule of Values · Define Pay Periods · Prepare a Draw Schedule |
· Prepare Application for Payment · Add Change Order Values · Add Contract Amendments |
Please refer to Project Setup and Administration to setup user rights for Pay Applications. The Pay Applications module will not be shown until the initial setup is complete. |
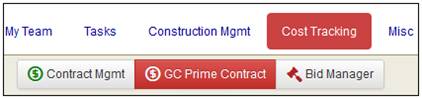
To access the Prime Contract Pay Applications module: 1. Click the GC Prime Contract button in the Cost Tracking tab. |
|
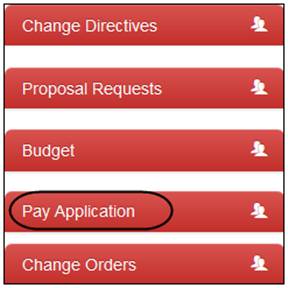
2. Select Pay Application in the left-side menu.
The Pay Applications action options will display under the Pay Application thread name. |
|
Contractor prepares a schedule of values for the contract. Before the first pay application can be created, the Description of Work and Scheduled Values need to be added. The entries listed here will remain consistent throughout the project. The Grand Total at the bottom of the page should be equal to the Original Contract Sum. You will not be able to edit existing entries after the first pay application is approved. However, you may add new entries to adjust the Original Contract Sum during the course of the project by adding Change Orders.
There are three ways to create a Schedule of Values: manually, by Excel import template, and from the budget. |
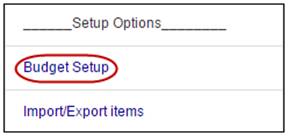
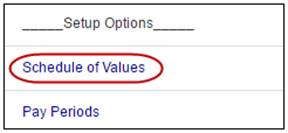
To manually prepare a Schedule of Values: 1. Click the Schedule of Values link under Setup Options from the left-side menu. |
|
The Pay Application – Schedule of Values screen displays.
2. Click the Add New Entry link to add a new Schedule of Values item. |
|
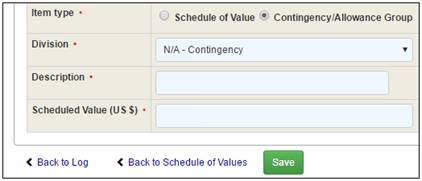
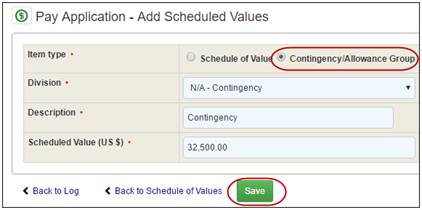
3. Select the Item Type: Schedule of Value or Contingency/Allowance Group.
4a. For Schedule of Value, use the drop-down lists to select the Division and Spec Number. |
|
4b. For Contingency/Allowance Group, enter the Description.
5. Enter the Scheduled Value amount.
6. Click the Save button. |
|
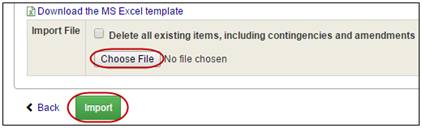
To import a list of Schedule Values: 1. Click the Import Items link. |
|
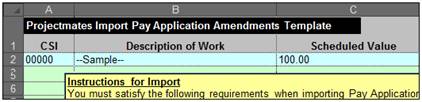
2. Click the Download the MS Excel template link. |
|
3. Enter the information in the file and save the file to your computer. Note: Instructions for completing the import template file are included in the file. |
|
4. In Projectmates, optionally, mark the check box to Delete all existing items, including contingencies and amendments. 5. Click the Browse… or Choose File button and locate the file. 6. Click the Import button.
The information will be inserted in the schedule of values. |
|
Schedule of Values from Budget
Creating the Schedule of Values from the budget is easy if you have already entered the budget in your project. |
To create the Schedule of Values from the Budget: 1. Click on the Budget thread to expand the action links.
The Budget – Setup page will display. |
|
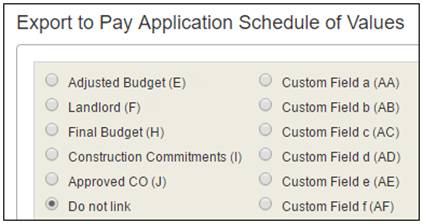
2. Scroll down to the Export to Pay Application Schedule of Values section. 3. Select the column name that holds the values to be used in the Pay Application Schedule of Values. 4. Click Save at the bottom of the screen. |
|
5. In the left side menu, click View Budget.
The Budget screen displays.
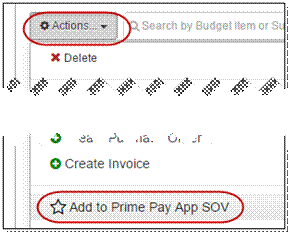
6. Mark the check boxes for the items to include in the Schedule of Values. |
|
7. In the Actions drop-down, select Add to Prime Pay App SOV. |
|
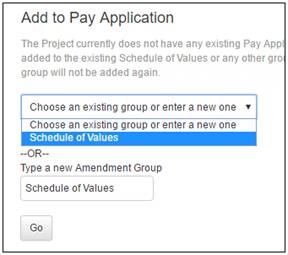
The Add to Pay Application pop-up displays.
8. Select an existing group from the drop-down or enter a different group. 9. Click Go. |
|
The Pay Application – Schedule of Values screen displays. |
|
Define Contingency Line Items in the Schedule of Values
Once the Schedule of Values is in place, you can change line items to be included as Contingency or Allowance group line items. |
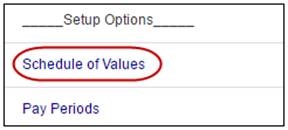
To change item type to Contingency or Allowance Group: 1. Click Schedule of Values in the left-side menu.
The Pay Application – Schedule of Values log displays. |
|
2. Click the Description link for the line item.
The Pay Application – Update Scheduled Values page displays. |
|
3. Change the Item Type to Contingency/Allowance Group.
Note: You can only change the item type if no pay applications have been created against the Schedule of Values.
4. Hit Save button. |
|
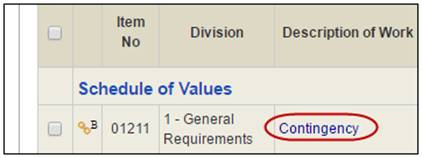
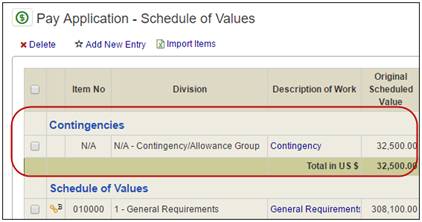
Now the item is listed in a new group called Contingency. |
|
A pay period is the time interval used to track pay applications. You can specify from and to dates, percentage of retainage for work completed and materials stored. There may be only one pay application per pay period. You can delete or edit a pay period only if the pay application for that pay period has not been prepared. |
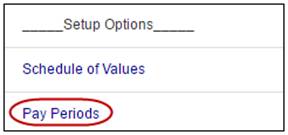
To define pay periods: 1. Click the Pay Periods link under Setup Options in the left-side menu. |
|
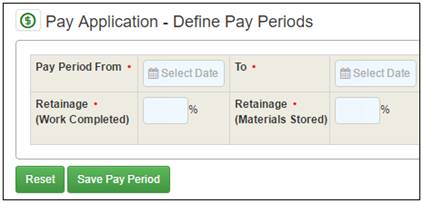
The Define Pay Periods screen displays.
2. Select the Pay Period From date and the To date. 3. Enter the Retainage (Work Completed) and Retainage (Materials Stored) percentages. 4. Click the Save Pay Period button.
The first pay period is created. Repeat this process to create additional pay periods for the project. |
|
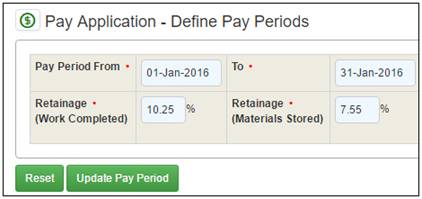
To edit the pay period values: 1. Click the date range link. |
|
2. Make the necessary changes.
3. Click the Update Pay Period button. |
|
Prepare Application for Payment
Creating a new Pay Application is a 3-step process. First, enter the value of work completed. Next, process a paper copy of the pay application. Last, certify the pay application. |
Step 1: Enter value of work completed
To enter the value of work completed: 1. Click the Pay Application link from the left-side menu.
The Pay Application screen displays. |
|
2. Click the Create New link in the Continuation Sheet column for the appropriate pay period.
The Continuation Sheet displays. |
|
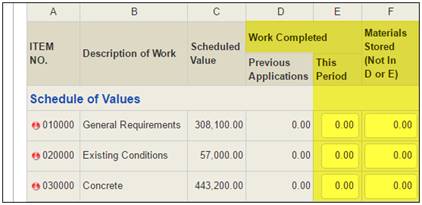
3. Enter values for Work Completed This Period and Materials Presently Stored. 4. Click the Save button.
You can edit and save the values until the Pay Application is certified. Simply repeat this process to add or edit the values. Note: Both decimal and percentage values are allowed when entering values in the Pay Application spreadsheet. |
|
To certify the Pay Application, click the Prepare Application for Payment link. |
|
Step 2: Process Paper Application
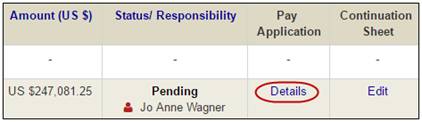
To print a copy of the payment application: 1. Go to the Pay App log and click the Details link for the Pay App you want to print. |
|
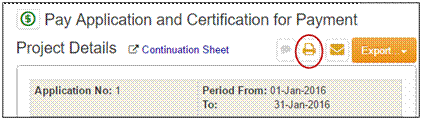
2. Use
the
The printer friendly version of the Pay Application will display in a new tab.
3. Use your browser's functionality to print. 4. Sign and notarize the document per your agreement. |
|
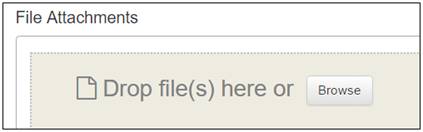
To attach files to the Pay Application: 1. Scroll down in the Pay Application detail screen to the File Attachments section. 2. Drag and drop files into the upload box or click the Browse button to select files to upload. |
|
3. Click Save to initiate upload process. Note: If you do not see the Save button, then you cannot upload attachments. Only users whose certification is required will see the Save button. |
|
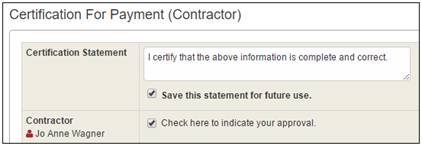
Step 3: Certify Application for Payment
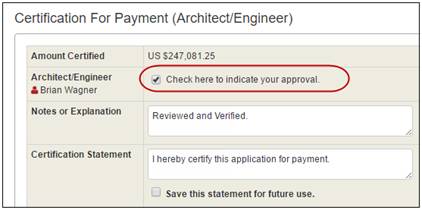
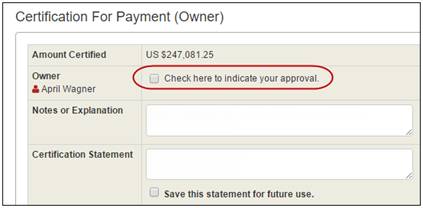
To certify the Application for Payment: 1. Review the Pay Application for errors and omissions. 2. Enter a statement in the Certification for Payment (Contractor) section. 3. Optionally, mark the Save this statement for future use check box. |
|
4. Mark the check boxes for users that need to receive notification emails regarding this pay application. |
|
5. Click the Save button and the new Pay Application is created. |
|
View and Respond to the Pay Application
Once a new Pay Application is created, an email notification is sent to the team members for approval processing. |
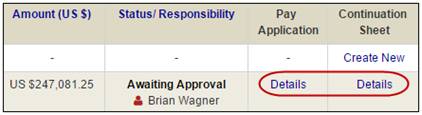
Reviewing Pay Application Details
To review the pay application details: 1. Click the Pay Application link in the left-side menu to view the Prime Pay Application log screen. |
|
2. In the Status/Responsibility column, look for a Pay Application with Awaiting Approval and your name as a responsible person. 3. You can review the details for accuracy of the Pay Application and the Continuation Sheet by clicking the Details links. |
|
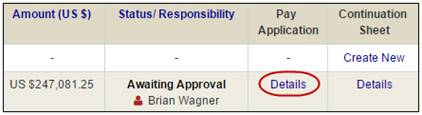
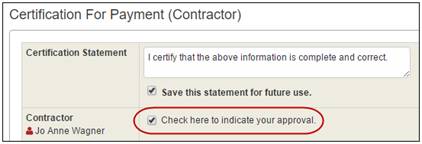
To certify a pay application: 1. From the Pay Application log page, click the Details link for Pay Application. |
|
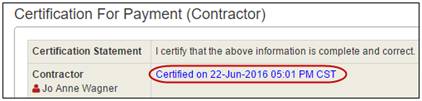
2. For
the Contractor: |
|
3. For
the Architect or Engineer: |
|
4. For
the Owner: |
|
5. Optionally, add any File Attachments. |
|
6. Add any necessary comments. 7. Mark the check boxes for any team members to be notified regarding this pay application. |
|
8. Click the Save button. |
|
Note: You will know that the certification was completed successfully when a date/time stamp in blue text displays next to your name, as in the example to the right. |
|
To reset a pay application: 1. From the Pay Application log page, click the Details link for Pay Application. |
|
2. Click the Reset button. Then click OK.
The Pay Application will become editable for the Contractor to correct and resubmit. |
|
Note: Once a Pay Application is created, the designated recipient will receive an email notification. If the Pay Application is not responded to in a timely fashion, the system will generate an email to the responsible party, notifying them of the outstanding overdue status. |
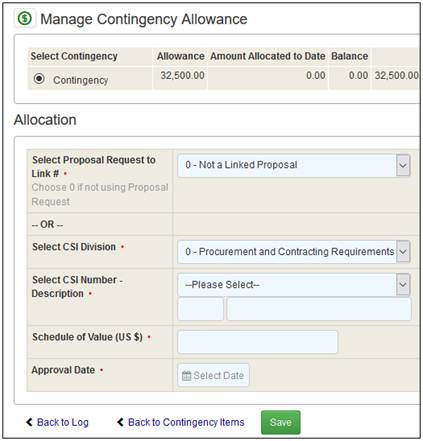
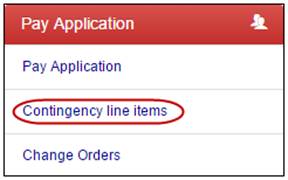
Apply Money towards Contingency
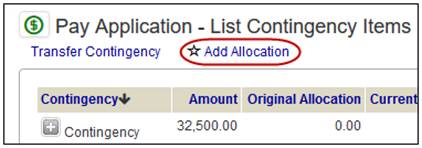
To apply money towards a Contingency or Allowance Group: 1. Click the Contingency line items link in the left-side menu under the Prime Pay Application thread.
The Prime Pay Application – List Contingency Items screen displays. |
|
2. Click the Add Allocation link. Note: If you see message, "No contingencies have been configured in the Schedule of Values for this project," please refer to the section above called: Define Contingency Line Items in the Schedule of Values. |
|
3. Select the Contingency / Allowance item.
4. Select an approved Proposal Request to be linked to this item or retain the default value 0 - Not a Linked Proposal. 5. Use the drop-downs to select the CSI Division, Number and Description, or enter these manually. 6. Enter or modify the Scheduled Value. If this is linked to a Proposal Request, the total amount of the Proposal will be pre-filled. 7. Click in the date field to select the Approval Date. 8. Click the Save button.
The Saved line item will be added to your NEXT Pay Application. |
|
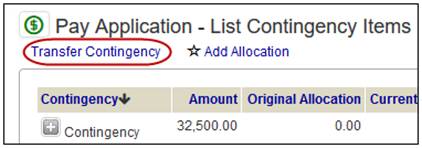
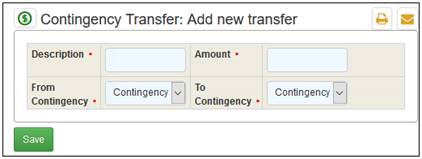
Transfer Amounts between Contingencies
To transfer amounts between contingency line items: 1. Click Contingency Line items link in the left-side menu. |
|
2. Click the Transfer Contingency link. |
|
3. Enter Description and Amount to transfer. 4. Select From and To Contingency items. 5. Click the Save button.
The contingency amount will be adjusted and the transfer will be recorded in the Transfer Log. |
|
All approved change orders processed within Projectmates will be automatically added to the schedule of values. If you have any change orders processed before setting up the pay application module, or any change orders processed outside of Projectmates, you need to add them manually. |
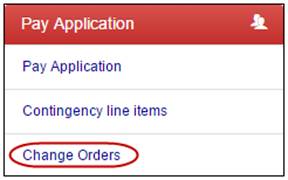
To manually add change orders: 1. Click Change Orders link in the left-side menu.
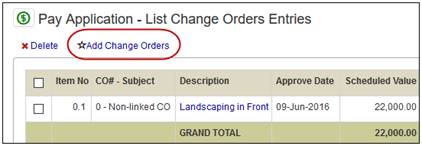
The Pay Application – List Change Orders Entries screen will display. |
|
2. Click the link to Add Change Orders. |
|
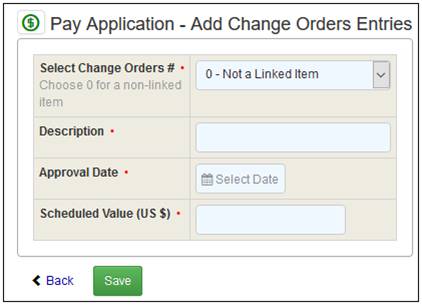
3. Use the drop-down list to select an existing change order to link to this entry.
Note: By default, 0 – Not a Linked Item is selected. Keep this if you do not wish to link this entry to an existing change order.
4. Enter the Description, Approval Date, and Scheduled Value.
5. Click the Save button. |
|
Adding Amendments to Schedule of Values
Typically in fast-track projects, different packages are added to the projects as they are bid out. These bid packages can be added to the current schedule of values by amendments. |
To add amendments to the schedule of values: 1. Click Schedule of Values link in the left-side menu.
The Pay Application – Schedule of Values screen displays. |
|
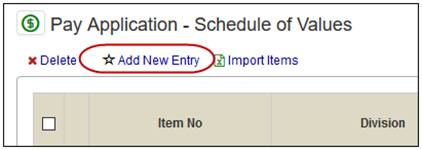
2. Click the Add New Entry link.
Note: If there are existing pay apps, the Pay Application – Add Amendment Item screen will display. |
|
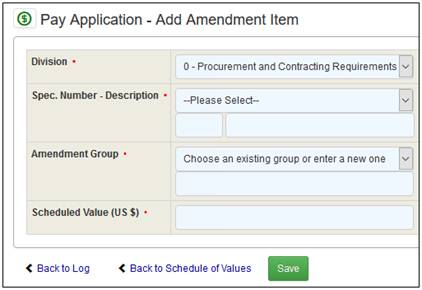
3. Use
the drop-down lists is select the Division
and Spec. Number - Description. 4. Use the drop-down list to select an existing Amendment Group or enter a new one. 5. Enter Scheduled Value amount. 6. Click the Save button.
Note: Saved line items will be added to your NEXT Pay Application. |
|
To import amendment line items into the Schedule of Values: 1. Click Schedule of Values link in the left-side menu.
The Pay Application – Schedule of Values screen displays. |
|
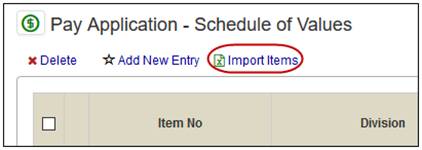
2. Click the Import Items link. |
|
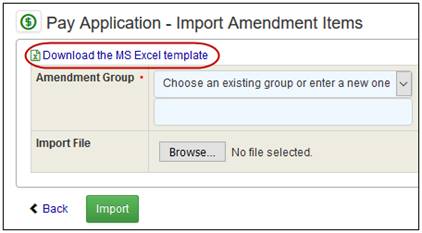
3. Click the link to Download the MS Excel template. |
|
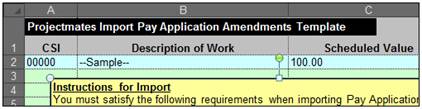
4. Follow the instructions provided to complete the template and save the file to your computer. |
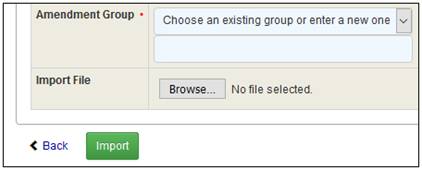
|
5. In Projectmates, use the drop-down to select the Amendment Group or add a new one. 6. Click Browse… or Please Select button to locate the saved template file. 7. Click the Import button.
Note: All entries in the Excel template will be added to the NEXT Pay Application. |
|