For ease of record keeping, Projectmates Schedule keeps the information you enter and also saves the additional information it calculates in appropriate fields, such as task names or duration. As you build a project plan, Projectmates Schedule creates a working time line based on the information you provide including baseline and actual data. Projectmates Schedule incorporates it all, tasks to be completed, team members assigned to specific portions of the project, important meetings and milestones, into one easy-to-view time line. To add tasks or adjust durations, you can upload Microsoft Project files (.mpp) or Microsoft Excel (.xls) files.
Projectmates Schedule is designed as a multi-threaded tool. This means it is easy to maintain multiple schedules, each with their own varying degree of assigned user privileges. The Project Administrator configures the schedule thread and assigns rights, including View, Add, and Publish. Examples of schedule threads include: Design Schedule, Construction Schedule, and Team Schedule.
Assigned tasks are automatically added to the My Work tab for the team members responsible for them. Upon logging into Projectmates, each team member can access the Ball in Court items specifically addressed to him or her. For a quick review of project milestones, simply refer to the Schedule Milestones applet on the home page of your project. Projectmates Schedule also allows you to view your schedule as a calendar or a Gantt chart.
The Schedule Mini Report displays a summary of all Schedules the user has rights to view. |
Watch the Schedule Introduction Training Video
Projectmates University offers several training videos to help on-board new users.
To access the Schedule Introduction training video,
look for the ![]() Video
icon.
Video
icon.

Set-Up Schedule Defaults
To set-up a new Schedule, or to edit an existing Schedule: 1. Click the Settings and Options link in the left-side menu for the Schedule thread you want to set up. |
|
2. Optionally, change the schedule type from Start Date to End Date oriented. Note: When Start Date is selected, all tasks use the default date as a start date. Changing the duration will cause the end date to move accordingly. Alternatively, when End Date is selected, all tasks use the default date as an end date. Changing the duration will move the start date accordingly. 3. Click in the date field to select the start or end date. Note: Once tasks are created in a schedule, defaults for schedule based on the Start date or End date cannot be changed. |
|
4. Define your schedule's work week by checking the days of your working week. Note: Non-working days are skipped over when the system auto-updates the schedule. 5. Optionally, click the link to edit holidays for this schedule. |
|
· To add new holidays to this schedule, enter the description, set the date range, and click the Add button. · To edit an existing holiday in this schedule, click the Edit link, make the changes, and click the Change button. · To remove an existing holiday from this schedule, click the Delete link for the holiday.
Note: Site-wide holidays are automatically applied to all schedules within Projectmates and cannot be changed. |
|
6. Optionally, enter a description of the schedule.
7. Select the percent complete options as instructed.
8. Click the Save button. |
|
Schedule Tags
Tags are a method of graphically flagging the status or required action for a task. Tag functionality is optional, determined by those with permissions to change schedule thread setup options. By default, tags are not enabled for use.
|
There are two options for enabling tags. The first option is to allow users to select tags from a predefined list. The second option is to allow users to create their own custom tags as they use the Schedule module. |
To activate and setup tags: 1. Click the List of Tags link in the left-side menu. |
|
2. Click the Edit Options link on the right. |
|
3. Use the drop-down menus to change the default Will Not settings to Will for either flag option or both. 4. Click the Update button. |
|
To create a list of predefined tags: 1. Select a tag from the image drop-down box. 2. Enter a description for the tag. 3. Optionally, determine if a comment is required when this tag is used. For example, if a Critical Action tag is created, documentation may be required to further clarify this status. 4. Click the Save button.
The new tag will appear in the list.
To modify or remove a predefined tag, click the Edit or Delete links. |
|
Importing from MS Project® Schedule
You can import a schedule prepared in Microsoft Project 2010 or earlier. The following information is imported from the project file: task name, start date, duration, end date, predecessors, deadlines, constraints, milestones, and comments. |
To import a project schedule from MS Project: 1. Click the Import/Export link in the left-side menu.
The Import/Export screen is presented.
Note: Projectmates provides some sample MS Project templates, which are available for downloading from the links on this page.
Note: Depending on the size of your file, it may take 10 to 45 seconds for the schedule to be imported. Wait until you see the confirmation that the schedule was imported successfully. |
|
2. Click the Browse… or Choose File button to select the MS Project file. 3. Mark the check box to confirm that all existing items will be deleted upon uploading this file. 4. Click the Import button. |
|
Note: If you experience problems trying to import an MS Project file, please open the file in MS Project. Go to File > Save As. Change the Save as type to Microsoft Project 2007 (*.mpp). |
The following information is imported from the Excel file: DisplayID, WBS, Task Name, Base Start and Finish dates, Planned Start and Finish dates, Actual Start and Finish dates, IsParent, Task Outline Level, Predecessors, Predecessor Type, Lag Days, Resources, and IsMilestone. In order to import a schedule from a Microsoft Excel file, you must use the Excel template provided by Projectmates. |
To import a schedule from Excel: 1. Click Download MS Excel template link. |
|
2. Enter the appropriate data for your schedule. Note: The required data fields in the spreadsheet are shaded in green. |
|
3. Click the Browse… button to select the template file. 4. Select the check box to confirm that all existing items will be deleted upon uploading this file. 5. Click the Import button. |
|
To export the existing schedule tasks, click the Export button. |
|
To create a new task: 1. Click the Create New Task link in the left-side menu. |
|
Note: Alternatively, you can click the Create New Task option from the Actions drop-down menu.
2. Continue with instructions under General tab, below. |
|
To modify an existing task: 1. Click the description link for the task. Note: You must have rights to add or modify tasks to use this feature. 2. Continue with instructions under General tab, below. |
|
Note: The Setup/Modify Task screen has five tabs for setting up different options.You must save the information entered in the General tab before you can proceed to the other tabs. There are two types of tasks in Projectmates Schedule: tasks that occur once and recurring tasks. The system defaults to Non-Recurring task type, which can only be altered before the task is initially saved. When a recurring task type is selected, the fields in the General tab will change, and other tabs are no longer available. |
For a non-recurring task (most common task type): 1. Enter description in Task name field. |
|
2. Define the duration as a whole number of days or weeks. 3. Optionally, mark if the duration is an estimate. |
|
4. Click in the date fields to select the start and finish dates for this task. 5. Optionally, you can define the priority level or select to create a baseline using the original planned dates. |
|
Note: The percent (%) complete field may look a little different than the one presented here. The options available for this field are set up by the Project Admin. This field refers to how close this task is to completion. |
6. If this task has already been started, or is completely done, indicate the status in the % Complete field. |
|
7. Check any of the options that apply. |
|
Note: Milestones are identified as milestones in the Calendar and Gantt chart. Upcoming Milestones are displayed on the project home page as well as in the Milestone report in Projectmates Portfolio. Note: Disabled tasks appear grayed out and crossed out in the schedule, and do not send reminders or appear in responsible party's My Work tab. A disabled task can be enabled later. |
· To send an email notification to team members, mark the check box. · To see if any holidays may interfere with this task, click the Show/Hide holidays link. 8. Click the Save button to continue. |
|
For a recurring task (uncommon): 1. Enter description in Task name field. 2. Define the duration as a whole number of days or weeks. 3. Optionally, mark if the duration is an estimate. 4. Select the radial button for Recurring.
New options pertaining to recurring tasks will display. |
|
5. Click in the date fields to select the start and finish dates for this task. 6. Optionally, you can define the priority level or select to create a baseline using the original planned dates. |
|
7. Set the number of times this task will occur during this time frame in the Occurrences field. 8. Use the radial buttons and any drop-downs to set the Recurrence pattern. |
|
9. Check any of the options that apply. |
|
· To send an email notification to team members, mark the check box. · To see if any holidays may interfere with this task, click the Show/Hide holidays link. 10. Click the Save button to continue. |
|
Note: These features only apply to non-recurring tasks.
1. Optionally, use the Hyperlink field to add a website address associated with this task.
2. Optionally, use the Constraint Type drop-down menu to set parameters for this task's start and finish dates.
3. Optionally, enter the WBS Code to be associated with this task. The WBS code is listed on the log page and can be used to sort the task list. |
|
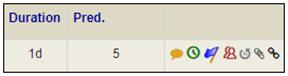
4. Optionally, click in the date field to set a Deadline and/or Constraint Date. Note: If the actual date exceeds
the deadline, an alert icon
5. Click the Save button before continuing. |
|
The Resources tab is where you would select the responsible persons for performing this task.
· Responsible persons can be identified by named user or by role by simply selecting the appropriate radial button. · To select one or more users or roles to be responsible for this task, mark the appropriate check boxes. · This task will be displayed in the responsible party's My Work tab, as well as in his/her My Tasks menu. · Optionally, you can set-up reminders to be sent to the responsible party regarding this task. Reminders can be sent at specified days before or after the task end date. · Click Save to keep any changes. |
|
This is where you would set up relationships between tasks within this schedule thread to establish the timeline. Note: Setting up predecessors will automate schedule changes. To set a predecessor for this task: 1. Select a Task from the drop-down menu. 2. Select the Type of relationship between these two tasks. 3. Enter the number of Lag days, if any. 4. Click the Save button.
The predecessor will be displayed at the bottom of this tab. · You can have multiple predecessors for one task. · To modify a predecessor, click the Edit link, make the changes, and hit Save. · To remove a predecessor, click the Delete link. |
|
To upload attachments: 1. Click the Browse button to select one or more files. 2. Alternatively, drag and drop files in the pop-up. 3. Click Upload button and wait for the files to complete the upload process.
· To download attachments, click the name of the file link.
· To delete attachments, mark the checkbox for the file and click the Delete link.
· To
add comments, click the |
|
To quickly edit or view another task, click the Prev Task or Next Task links. |
|
Comments, Time Tracking, and Tags
From the All Tasks page,
comments, time tracking and tags can be added to each schedule
task by clicking on the Comment
When tasks have comments, time, or a tag, the associated icons appear in color. You can click these icons to view the information. |
|
To add comments, time spent, or a tag: 1. Click any of these icons to access the Comments pop-up. 2. Mark the appropriate check boxes for the information you want to add. Note: When the check box is selected for comments, time or tags, the fields needed to enter this information are displayed. 3. Click the Save button when you have finished entering the information. |
|
To add comments: 1. Click the Comment
2. Add your comment in the text box. 3. Click the Save button.
The entry will display in the Currently Showing section with your name and a date/time stamp. |
|
To add Time Tracking to an item: 1. Click the Time Tracking 2. Add the hours spent in the appropriate format. Note: For 15 minutes enter hours as 0:15 or 0.25. For 2 hours and 30 minutes enter hours as 2:30 or 2.50. 3. Change the date or leave the current date default.
4. Optionally, click to Select who worked on this task button and continue to step 5. Otherwise, click to Save. |
|
The Add users or contacts pop-up will display.
5. Use the radial buttons and/or Keywords to filter the list.
6. Select the radial button for the user or contact. |
|
You will be immediately redirected back to the Comments pop-up.
7. Notice the name has been changed. 8. Click the Save button to keep the Time Tracking information. |
|
To add tags: 1. Choose a tag from the Existing Select Tag menu. 2. Alternatively, select a tag from the New Select Tab menu, and enter a description for the custom tag. 3. Click the Save button. |
|
To view the list of tasks, click either All Tasks or My Tasks from the left-side menu. |
|
This screen presents the list of tasks with tons of information, including % Complete, Start and Finish dates, Duration, Predecessors, and more. |

Views Available on the Tasks List Screen

Collapse – hides all child tasks. If a task is a parent and a child, it gets hidden. Expand – shows all child tasks Show – shows all subtasks Hide – hides any child-only tasks. If a task is a parent and a child, it does not get hidden. Create – takes the current planned dates and saves it as the baseline. This allows for comparison to track schedule changes from the original planned dates at a later time. Remove – clears the current baseline schedule |
Create/Remove a Baseline Schedule
To create or remove a baseline schedule: 1. Select one or more tasks. 2. Click the Create link to update the baseline schedule to the planned date for each selected task. 3. Click the Remove link to delete any baseline dates for each selected task. |
|
Several icons may be displayed to the right of a task to give users a quick glance at the properties for that task:
These icons are always present; however, they appear in gray when there is no information to display:
|
|
These icons are only shown when there is information to display:
|
|
To access the audit log for any task: 1. Notice that each
task has an 2. Click the |
|
3. Actions made to the task are displayed with user/date/time stamps. Note: Changes to Attachments, Resources, and Predecessor tabs are not recorded. |
|
Linking Action List items to Schedule Tasks
Multiple Action List items
can be linked to a single schedule task. Once the link has been
established, both the schedule task and the Action List item will
display a link |
The Schedule will update the due date for each linked Action List item. As each linked Action List item is completed and verified, the completion percentage for the schedule task will automatically update. To view the linked Action List items from
the Schedule, click the |
|
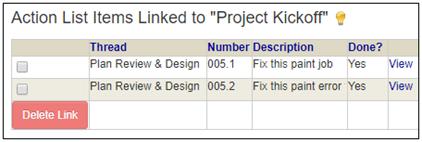
The Action List Items Linked pop-up will display.
· Click a View link to go directly to the Action List item. · Mark the check box for an Action List item and click the Delete Link button to remove the link. Note: Please refer to the section on Action Lists to learn more about creating links. |
|
Commands Available in the Actions Drop-Down List
Note: Users must have View, Add, Setup, Edit and Delete rights in order to have all of the following menu icons.
Disable/Enable Task – This is a toggle option. Mark the check box for items to be disabled or enabled. Then select this option. |
|
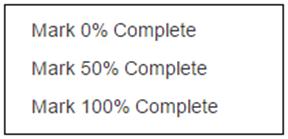
Mark 0% Complete, Mark 50% Complete, and Mark 100% Complete – Mark the check box for items to receive this completion status. Then select this option. |
|
Create New Task – Select this option to add a new item to the end of this schedule.
Insert New Task Before – Mark the check box for the item that you want to add a new task above. Then select this option.
Insert New Task After – Mark the check box for the item that you want to add a new task below. Then select this option.
|
|
Outdent – Mark the check boxes for items that you want to tab to the left.
Indent – Mark the check boxes for items that you want to tab to the right. Note: Changing the alignment of tasks changes child/parent relationships between tasks. |
|
Move – Mark the check box for the item that you want to remove from its current location and place in a new location inside the same schedule. Then select this option.
Copy – Mark the check box for the item that you want to remain in its current location and also place in a new location inside the same schedule. Then select this option.
|
|
Link to Budget – Mark the check box for the item that you want to link to the budget. Then select this option. |
|
Assign Resources – Mark the check box for one or more items that you want to assign to one responsible party. Then select this option. |
|
To delete or disable a task: 1. Mark the check boxes for one or more tasks to be removed or disabled. 2. Select the Delete or Disable option from the Action drop-down. 3. Deleted tasks are no longer included in this schedule. |
|
4. Disabled tasks appear in gray font and crossed out, as displayed on the right.
To enable a task, follow the steps above. This toggles to allow disabled tasks to be reactivated. |
|
Mark Percentage of Task Complete
To mark a task as complete, or partially complete: 1. Select tasks that have the same completion status. 2. Select the appropriate completion status option from the Action drop-down. |
|
Completed tasks are identified
by |
|
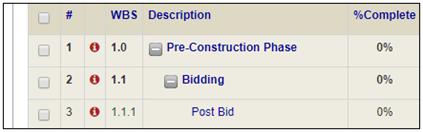
Parent Task vs. Child Task (Sub Task)
You can establish a relationship between tasks. Displayed in bold type, parent tasks show the cumulative start date and end date for all related child tasks. All related child tasks are indented from the parent task.
Child tasks can be collapsed for easier viewing: · To
hide the child tasks, click the · To
show the child tasks, click the |
|
To change tasks into child tasks, i.e. indent them: 1. If not already in this order, put all child tasks together in chronological order with the parent task immediately before the child tasks.
2. Mark the check boxes for the child tasks. |
|
3. Click the Indent option from the Actions… menu. |
|
The screen will refresh showing the changes you made.
To change child tasks into regular tasks, i.e. outdent them, mark the check boxes for the tasks and select Outdent from the Actions… menu. |
|
To copy or move tasks within the Schedule: 1. Select tasks to copy or move. |
|
2. Click the Copy or Move options from the Actions… menu. |
|
3. Select a task to use as a location reference in the schedule.
Items will be inserted after your selection. |
|
Linking schedule tasks to the budget applies the start/finish dates from the schedule task to the budget sub-item.
To link tasks to the budget: 1. Mark the check boxes for one or more tasks. |
|
2. Select the Link to Budget Action drop-down option. |
|
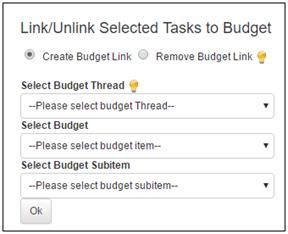
3. Select the radial button for Create Budget Link. |
|
4. Select an existing Budget Thread, Budget Line Item and Budget Subitem from the drop-down menus. 5. Click the Ok button.
To remove an existing link, select the radial button for Remove Budget Link. |
|
If you have multiple tasks to be completed by a single responsible party, you can use this feature to assign resources all at once. |
To assign a single resource to one or more schedule tasks: 1. Mark the check boxes for the appropriate tasks. |
|
2. Select Assign Resources from the Actions… menu. |
|
3. Resources can be selected by User or Role. Just mark the appropriate radial button. 4. Mark the check box for the responsible party to be assigned all of the selected tasks. 5. Click Save. |
|
Having a schedule in draft mode allows you to work on the schedule while keeping assigned tasks out of users' My Work tab. To send scheduled tasks to users' My Work tab, you need to publish the schedule. |
To publish a schedule, click the Save and Finalize button. |
|
To unpublish a schedule, click the Revert to Draft button. |
|
Compare Baseline to Planned Dates
To see the difference between the baseline and the planned dates of the schedule, click the Compare Baseline to Planned link from the left-side menu. |
|
· Scheduled tasks are displayed showing Base Start and Planned Start dates as well as Base Finish and Planned Finish dates.
· After each set of base vs. planned dates, there is a column showing the difference in number of days. |
|
Compare Planned to Actual Dates
To see the difference between the planned and actual dates of the schedule, click the Compare Planned to Actual link from the left-side menu. |
|
· Scheduled tasks are displayed showing Planned Start and Actual Start dates as well as Planned Finish and Actual Finish dates. · After each set of planned vs. actual dates, there is a column showing the difference in number of days. Note: When the Actual Start or Finish date is after the Planned Start or Finish date, the difference shows in red text. |
|
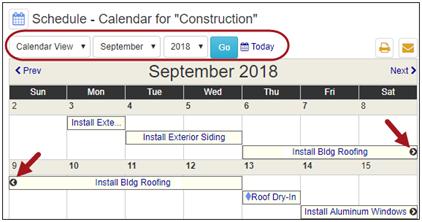
To display a schedule in the calendar view, click the Calendar link in the left-side menu. |
|
By default, the first month of the schedule is displayed.
To navigate to other months, click the |
|
To navigate to a specific month: 1. Use the drop-down menus to select the Month and Year. 2. Click the Go button.
· To
return to the current month, click the · The
· Similarly,
the · As in all schedule views, just click the task name to view the task details. · Milestone
tasks are indicated by the |
|
To display a schedule in the Gantt chart view, click the Gantt Chart link in the left-side menu. |
|
Parent tasks show the cumulative start and end dates of sub tasks.
To view a task in the Gantt chart, click anywhere in the task row.
To navigate to previous and next months, click
the back arrow |
|
To display more or less of the task information, click and drag the column dividers or the main divider to the left for less information or to the right for more information.
Tip: Hover the mouse pointer over the Gantt chart and use the scroll wheel to adjust zoom in and out. |
|
To view the filter options, click Show Filters link. |
|

To show a specific date range of the schedule, use the Start Time From and End Time To fields.
To display the Gantt chart in a predefined view, select one from the Options drop-down menu. · 2, 3, or 4 Week Look-Ahead · Show Only Milestones · Show All (This is the default setting.) |
|
To display the Gantt chart in specific intervals of time, select from the Time Scale drop-down menu: · Daily (This is the default setting.) · Weekly · Monthly · Quarterly · Yearly |
|
To view the critical path, mark the check box for Critical paths, which will display in orange highlight.
To view only incomplete tasks, mark the check box for Incomplete Tasks, which will hide any completed tasks.
To run the filter selections you have made, click the Filter button.
To clear the filter selections you have made, click the Reset link. |
|
To create an image of the Gantt chart, click the Export All To Image link. A PNG file will download showing the entire Gantt chart. |
|
To print the portion of the Gantt chart that is currently being displayed on the screen, click the Print Visible link. |
|