11. Agendas, Meeting Minutes and Tasks
The Meeting Minutes / Task Manager module is an application that will let you document and publish meeting agendas and meeting minutes as well as assign and track tasks.
You can have multiple threads of meetings within one project, such as Design meetings, Budget & Finance meetings, and Construction meetings, etc. Note: Meeting Minutes / Task Manager cannot be accessed until initial setup for the module is complete. Contact your project administrator to setup the modules and grant appropriate rights to users. |
Watch the Meeting Minutes Training Video
Projectmates University offers several training videos to help on-board new users.
To access the Meeting Minutes training video, look
for the ![]() Video
icon.
Video
icon.

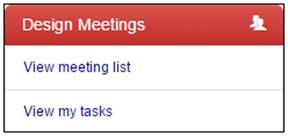
To view the meeting list: 1. In the left-side menu, click the name of the meetings you want to see. 2. Click the View Meeting List link. |
|
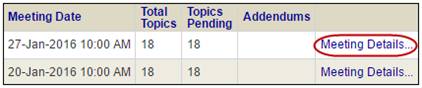
The meetings are listed in chronological order, starting from the latest on top.
To view the meeting minutes of a particular meeting, click the Meeting Details… link.
|
|
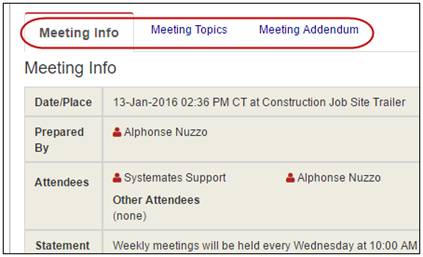
The meeting will open on your screen. Notice the tabs at the top. You can use these tabs to view the information for this meeting.
· Meeting Info tab shows the date/time/location of the meeting as well as the attendees and other general information. · Meeting Topics tab shows the detailed meeting minutes and tasks that were assigned in the meeting. · Meeting Addenda tab shows any addenda that were added to the meeting record after it was created and saved in Projectmates. |
|
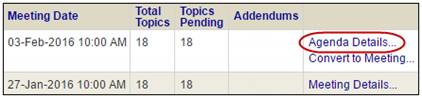
If the minutes were converted from a Meeting Agenda, then a link to the agenda is presented.
Click the Agenda Details… link to view. |
|
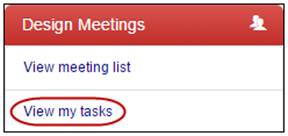
To view a list of tasks assigned to you, select the View my tasks link in the left-side menu. |
|
The next screen shows a list of tasks that are assigned to you, listed in chronological order.
Only tasks assigned to you in meetings that have been published will be listed here.
To mark items complete: 1. Click the |
|
The Add/Edit Comments pop-up will display.
2. Enter appropriate comments regarding the completion of task. 3. Mark the check box to 'Remove from my Ball In Court'. 4. Hit Save.
This will not only remove this from the My Work tab. It will also let the meeting organizer know that you have completed the task before the next meeting. |
|
You can prepare and publish an agenda for any scheduled meeting. When a meeting is in the agenda stage, the topics that are going to be addressed in the meeting are still being established. This allows the meeting organizers to coordinate and plan the meeting before publishing the details to the team. Once the agenda has been completed you will need to publish it so that other team members to be able to see it. Publishing the agenda allows the team members to see what topics are planned for the next meeting.
If you do not need the planning phase to establish the topics to be addressed, you can simply create meeting minutes and forgo creating the agenda. |
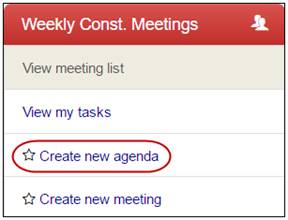
To create a new agenda: 1. In the appropriate meeting thread, click the Create new agenda link in the left-side menu. Note: If you have an un-published agenda or an un-published meeting, you will have to publish the agenda or meeting before you can create a new agenda. |
|
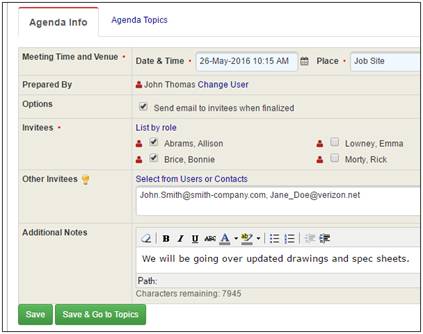
2. Complete the Date & Time and Place fields. 3. Select Invitees from the list. 4. Optionally, add
guests by entering email addresses separated by commas: 5. Optionally, enter any Notes that you might have. 6. Click the Save button or click Save & Go to Topics if you're ready to enter topics. |
|
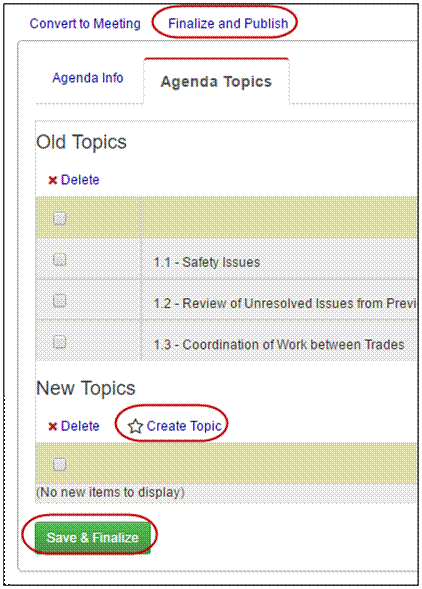
All outstanding topics are automatically added under the heading Old Topics.
To add new agenda topics: 1. Click the Create Topic link. A field will display when you do this. 2. Enter the description or title in the Topic field. 3. Click the Save button under the field.
The new topic will be added to the list under the heading New Topics.
You can add and edit the agenda items until the agenda has been published.
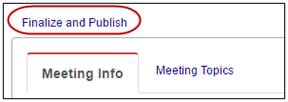
To publish an agenda, click the Finalize and Publish link or click the Save & Finalize button.
Publishing the agenda accomplishes a few things: 1. It makes the agenda accessible to team members with rights to view. 2. It sends email notification to the invitees. 3. It streamlines creating the meeting minutes after the meeting has occurred.
Note: You may edit the agenda after it is published, if you choose to do so. This will send new email notifications to the invitees. |
|
Meeting Minutes are designed to document what transpired in a meeting and to track completion of tasks that have been assigned in the meeting. |
Converting an Agenda to Meeting Minutes
If an agenda was prepared before the meeting, it can be converted into Meeting Minutes with a single click.
|
To save time and to keep the uniformity of tasks to be carried forward into the next meeting, it is recommended that you convert your agenda (if one exists for the meeting) into meeting minutes rather than preparing new minutes from scratch. |
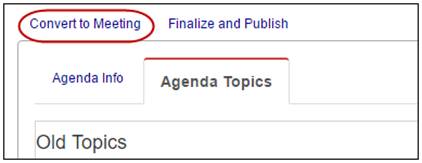
To convert an agenda into meeting minutes: 1. Open the last agenda. 2. Click the Convert to Meeting link.
After the agenda has been converted into meeting minutes, the information will need to be enhanced to indicate what was discussed and/or assigned during the meeting that took place. |
|
Note: If you have a published agenda for the meeting you want to create, you can convert that agenda into minutes. To keep meetings in chronological order, if you have un-published minutes, you will have to publish the minutes before you can create a new meeting.
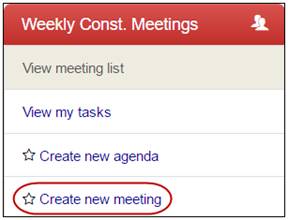
1. Click the Create new meeting link under the meeting thread in the left-side menu. |
|
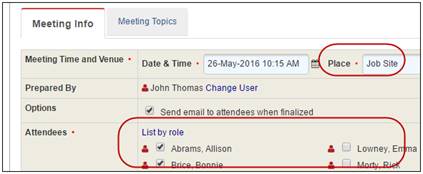
The Meeting Info screen is displayed.
2. Complete all information fields as necessary. Red dots indicate that the information is required to proceed further. 3. Click the Save button to save as a draft or click the Save & Go to Topics button to proceed with the Minutes. |
|
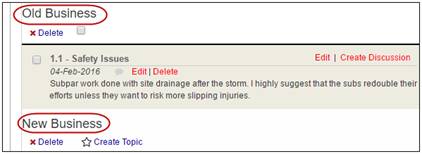
If you decided to Save & Go to Topics, you will be presented with the screen to edit old business and add new business topics and discussions. |
|
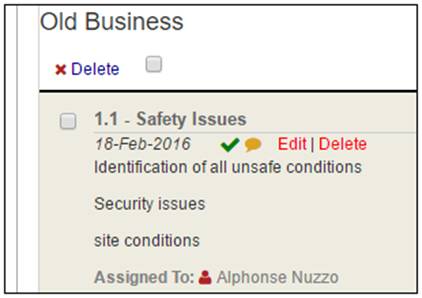
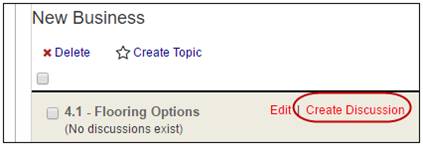
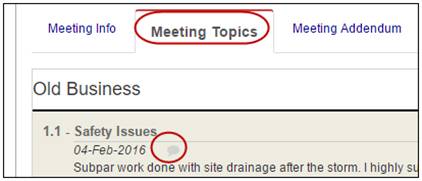
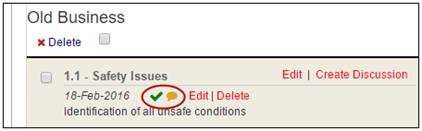
You will see all open topics from the previous meeting listed under Old Business. Each topic is listed by a topic number. The first number indicates the initial meeting that the topic was presented; the second number indicates the initial order of the topic during the initial meeting. For example, topic 1.2 Schedule Changes in the illustration below, was the second topic of the first meeting in this thread. This topic will continue to have this number until it is closed. |
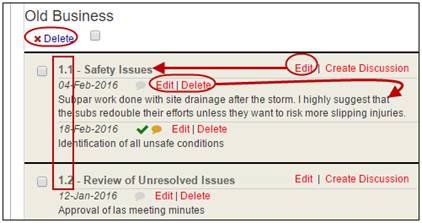
To remove a topic and all related discussions from this and further meetings: 1. Check the box beside the topic. 2. Click the
To modify or remove topic discussions, click the Edit or Delete links by the discussion topic.
Note: When you are editing a topic you can choose to close the discussion or the entire topic. |
|
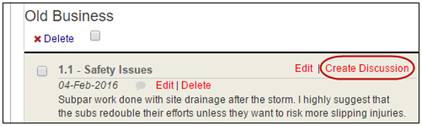
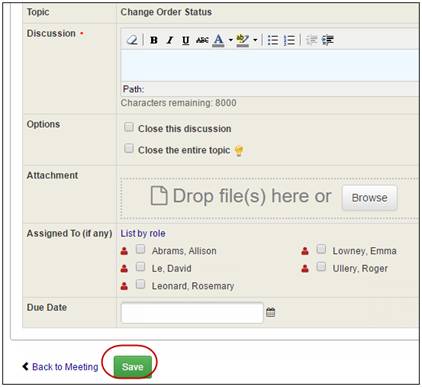
To add a new discussion regarding this topic: 1. Click the Create Discussion next to the topic. |
|
2. Enter the meeting notes in the Discussion field.
3. Optionally, indicate if this discussion or the entire topic is closed by marking the appropriate check box.
4. Optionally, attach any files that pertain to this discussion.
5. Optionally, assign one or more users to complete this task.
6. Optionally, set a Due Date for this task.
7. Click the Save button. |
|
More on Topic and Discussion Status
Topics marked as Closed will not display in the next meeting. In the same way, individual discussions will not be listed in future meetings when they are marked as closed. |
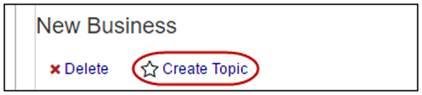
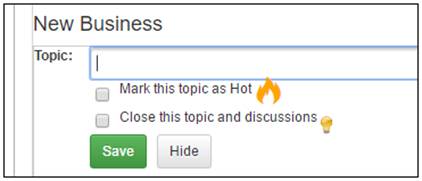
To add new topics to a meeting: 1. Under the New Business section of the Meeting Topics tab inside a meeting, click the Create Topic link. |
|
A field to add the new topic will display.
2. Enter a description or title for the Topic.
Note: Optionally, you can Mark this topic as Hot or Close this topic and discussions by marking the appropriate check boxes.
3. Click the Save button immediately below the new topic. |
|
The new topic will appear under the heading New Business.
To add discussions to this new topic, click the Create Discussion link and follow the instructions above. |
|
Note: Meeting minutes are not available to other users until the minutes are published. Before the minutes are published, the log will show the minutes as a Draft, and only the creator and the Administrators can see it. |
To publish the meeting minutes: 1. Open the meeting log page and click the Edit Meeting… link. |
|
2. After reviewing your topics and discussions, click the Save & Finalize button.
3. A confirmation pop-up will display. Click Ok to confirm. |
|
Note: User must have rights to publish the minutes. Otherwise the Finalize and Publish link will not be shown. |
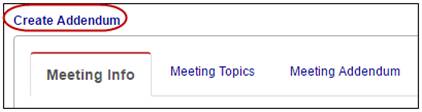
Add Addenda, Comments and Flag Topic Complete
Note: Users cannot modify the minutes once the meeting minutes are published, but you can issue an addendum to the minutes. Additionally, you can add comments to the discussions and flag the topics and/or discussions as complete. The preparer of the minutes can actually show the items to be complete when he/she publishes the next meeting minutes. |
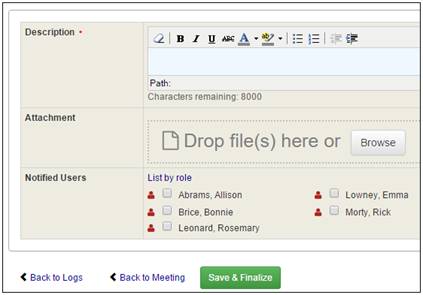
To add an addendum to a published meeting: 1. Click the Meeting Details link for that meeting. 2. Click the Create Addendum link. |
|
In the Add/Edit Addendum screen: 3. Enter the Description. 4. Optionally, attach any files. 5. Optionally, select users to be notified. A notification email will be automatically sent to those selected. 6. Click the Save & Finalize button.
The name of the person who published the addendum and a time/date-stamp will be added to the addendum. |
|
Note: Many different users are assigned tasks during meetings. However, generally a limited number of users are able to prepare the meeting minutes. Adding comments and flagging a topic as complete are ways that users can track their activities regarding assigned tasks. |
To add comments and flag a topic as complete: 1. Open the meeting details from the meeting log. 2. Click the Meetings Topics tab.
3. Click the Comment |
|
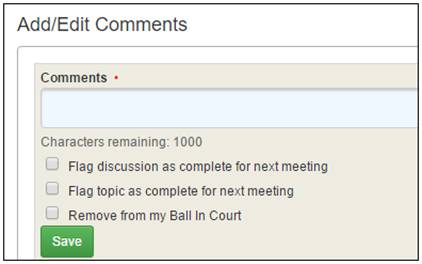
4. Add details in the Comments text box.
5. Optionally, click the check boxes to flag this discussion or the entire topic as complete. 6. Optionally, click the last check box to remove this task from your Ball in Court. 7. Click the Save button. |
|
When topics or discussions have comments, this is indicated and accessible by the yellow comment icon.
When a task is marked complete, it is indicated by the green checkmark. |
|